【XCode】TableViewのCellをカスタマイズする

環境

  • MacBook Air M1
  • OS : 11.2(20D64)
  • XCode : 12.4
  • Swift : 5.3.2

参考

1. 新規ファイル追加でCocoa Touch Classを選択
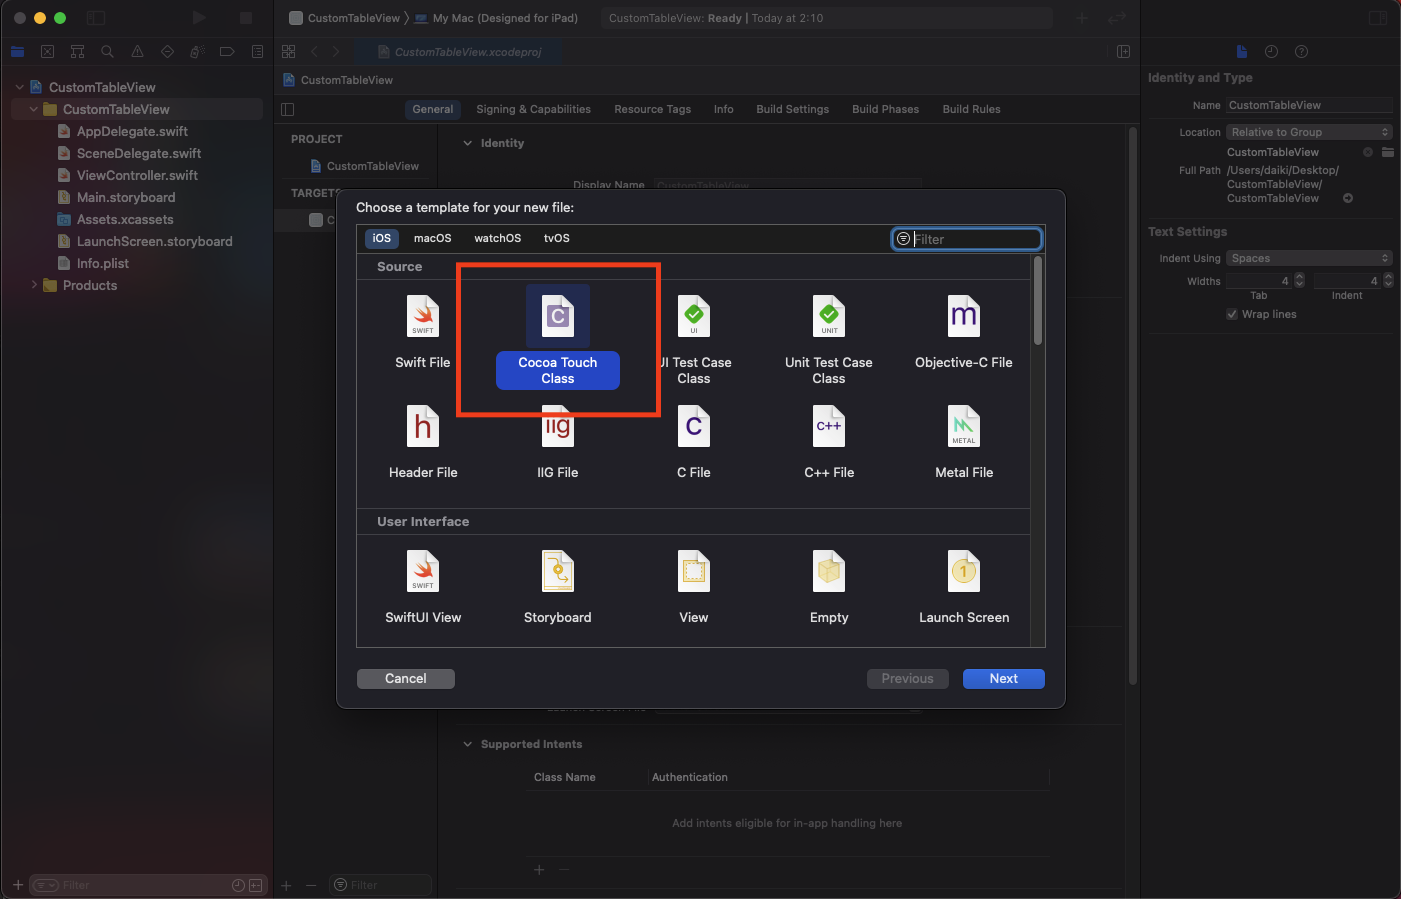
新規作成

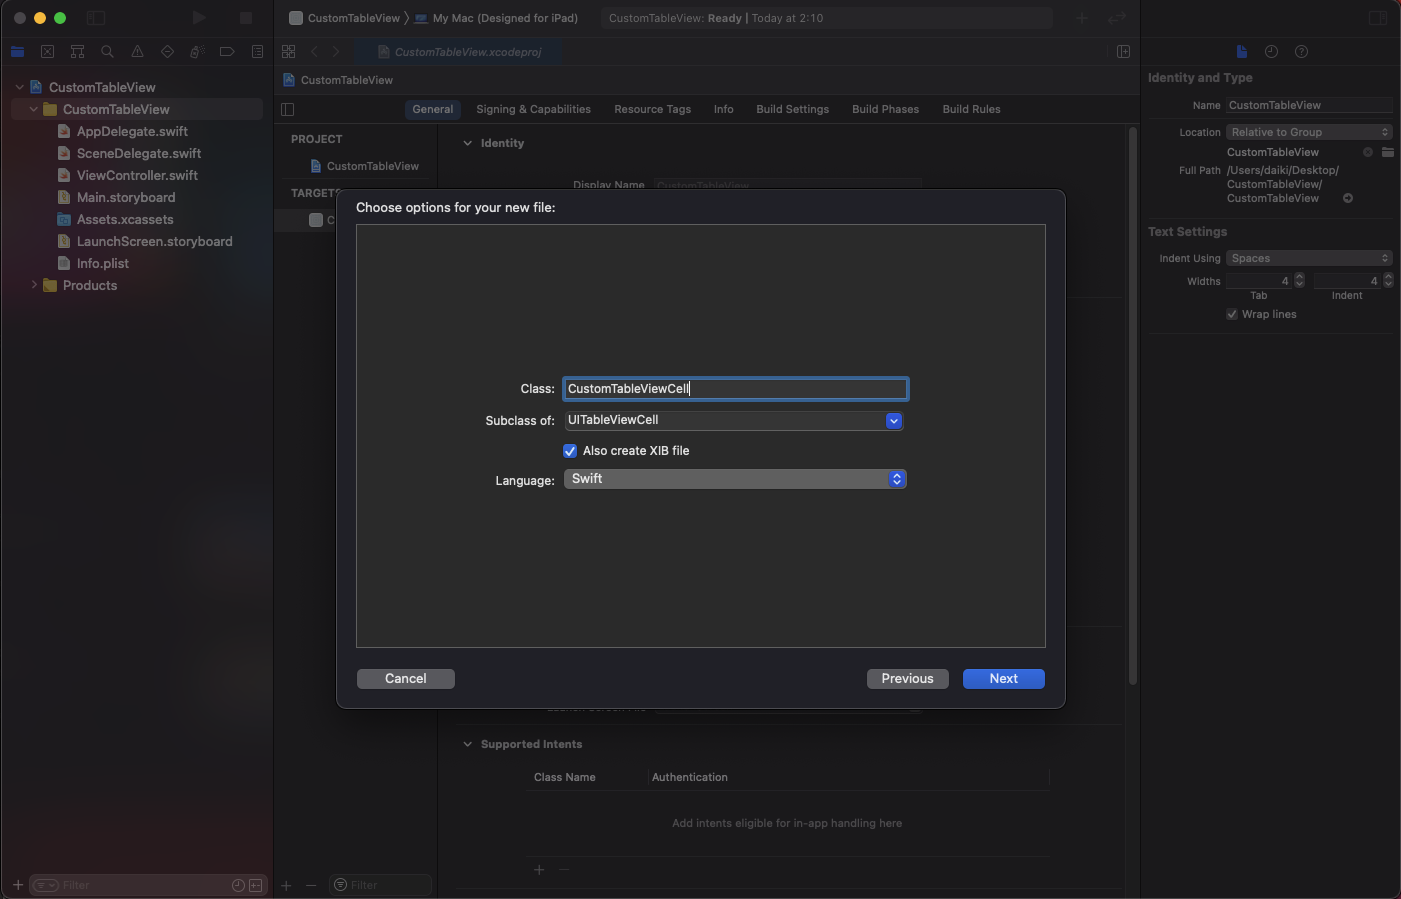
2. 作成時の設定

  • Class : 好きな名前(今回はCustomTableViewCell)
  • Subclass of : UITableViewCell
  • Also create XIB file : ON
  • Language : Swift

作成時オプション

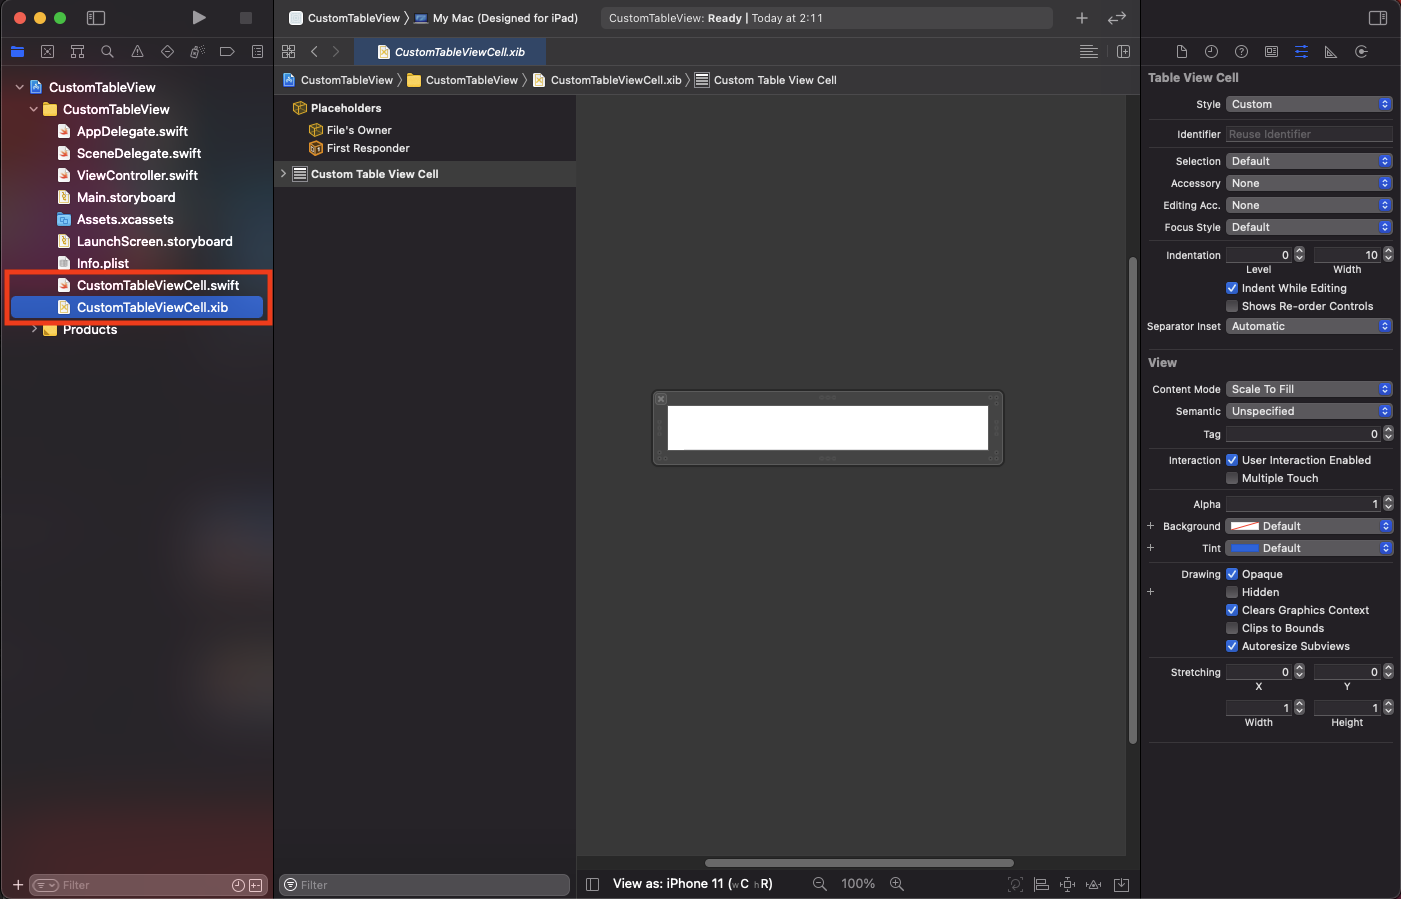
2つの新規ファイルが生成されればOK
作成済みチェック

3. CustomTableViewCell.xibを編集

Cellにラベルを追加
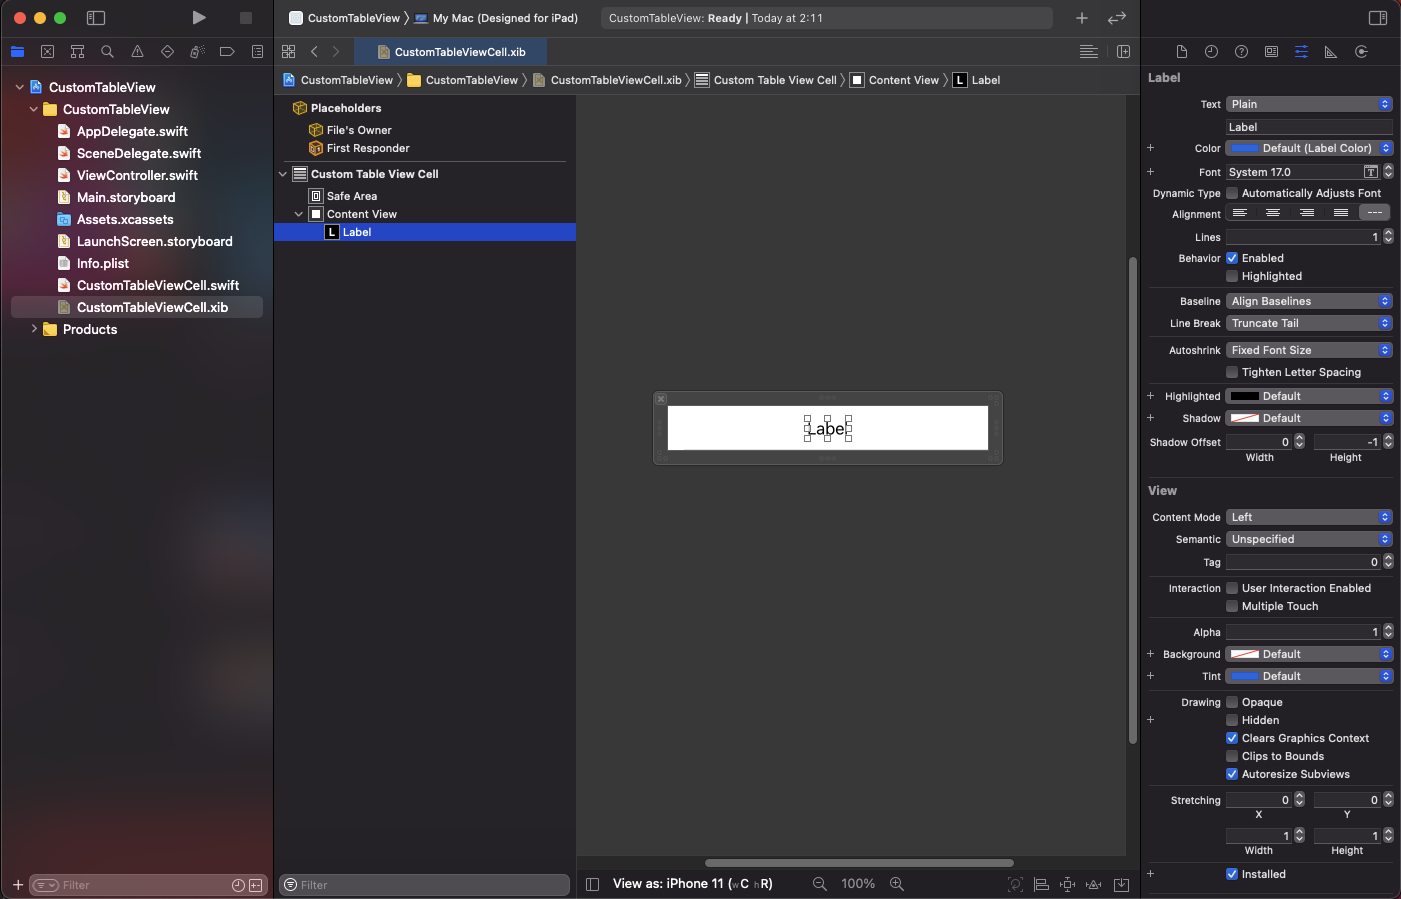
ラベル追加

Rostoration IDの設定

任意の文字列でいい(セル生成時に使用する)
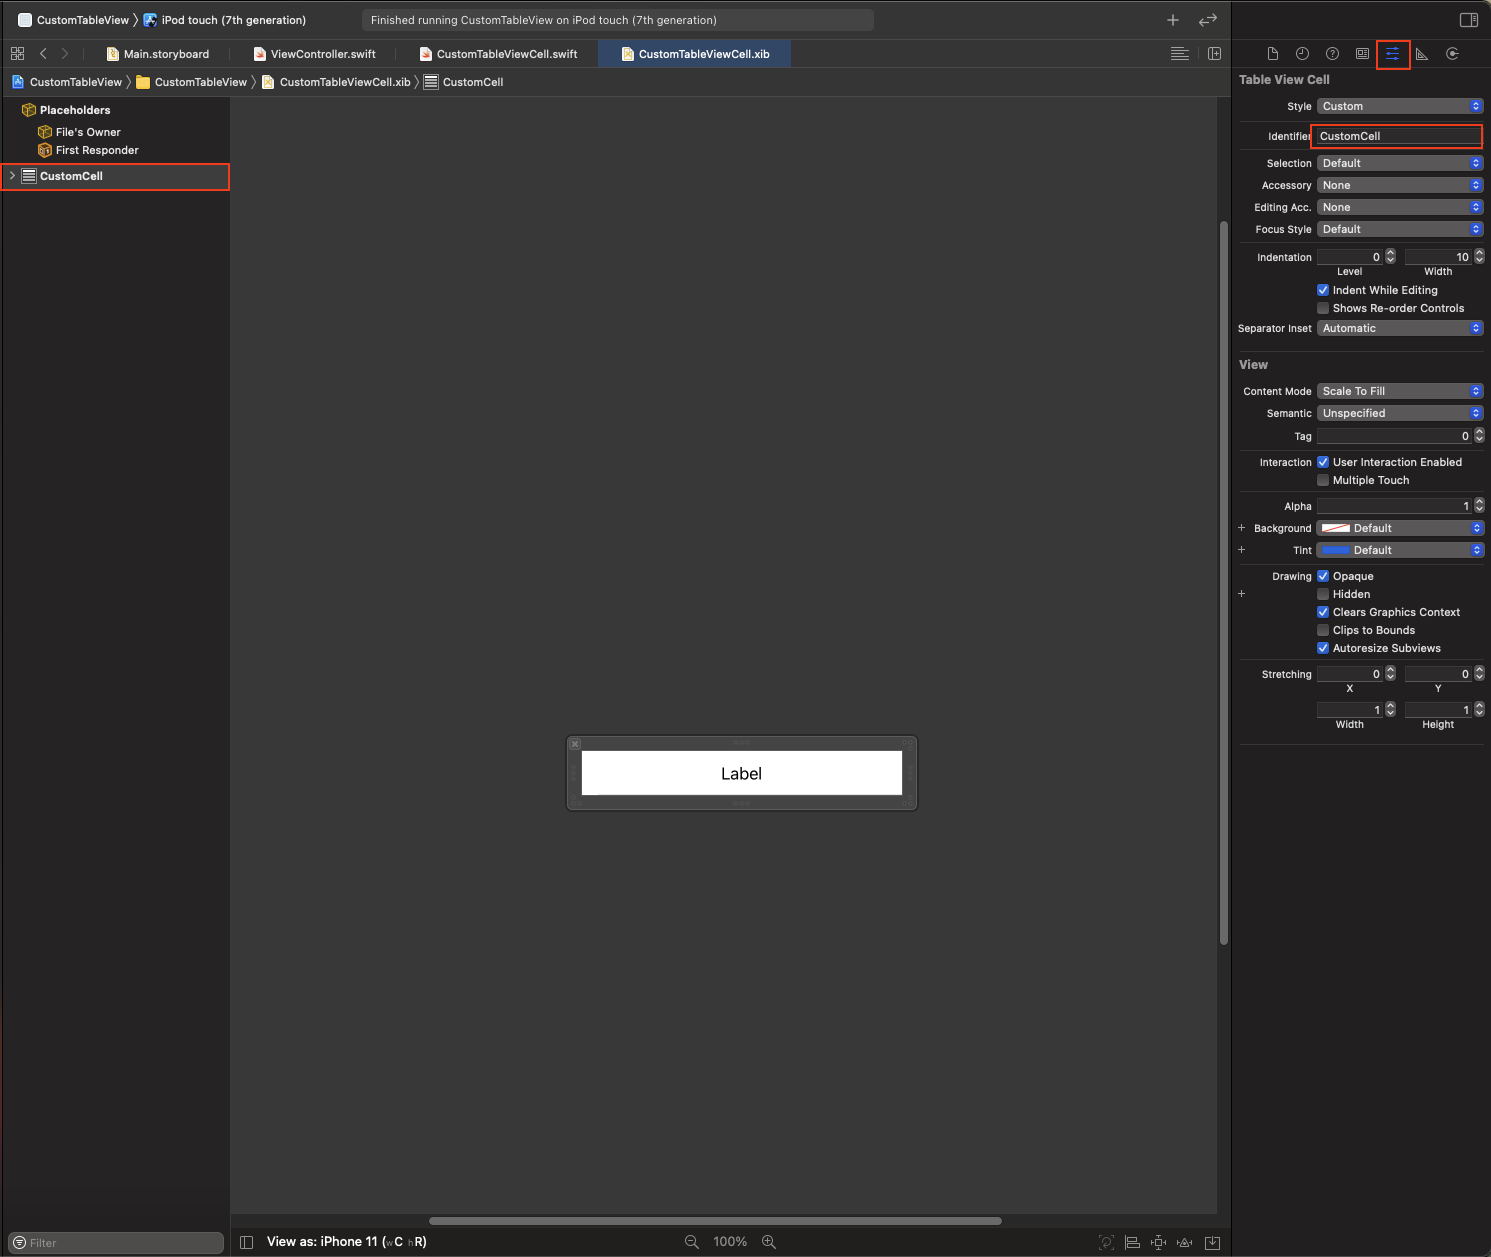
Identifier

4. CustomTableViewCell.swiftでラベルの参照を設定
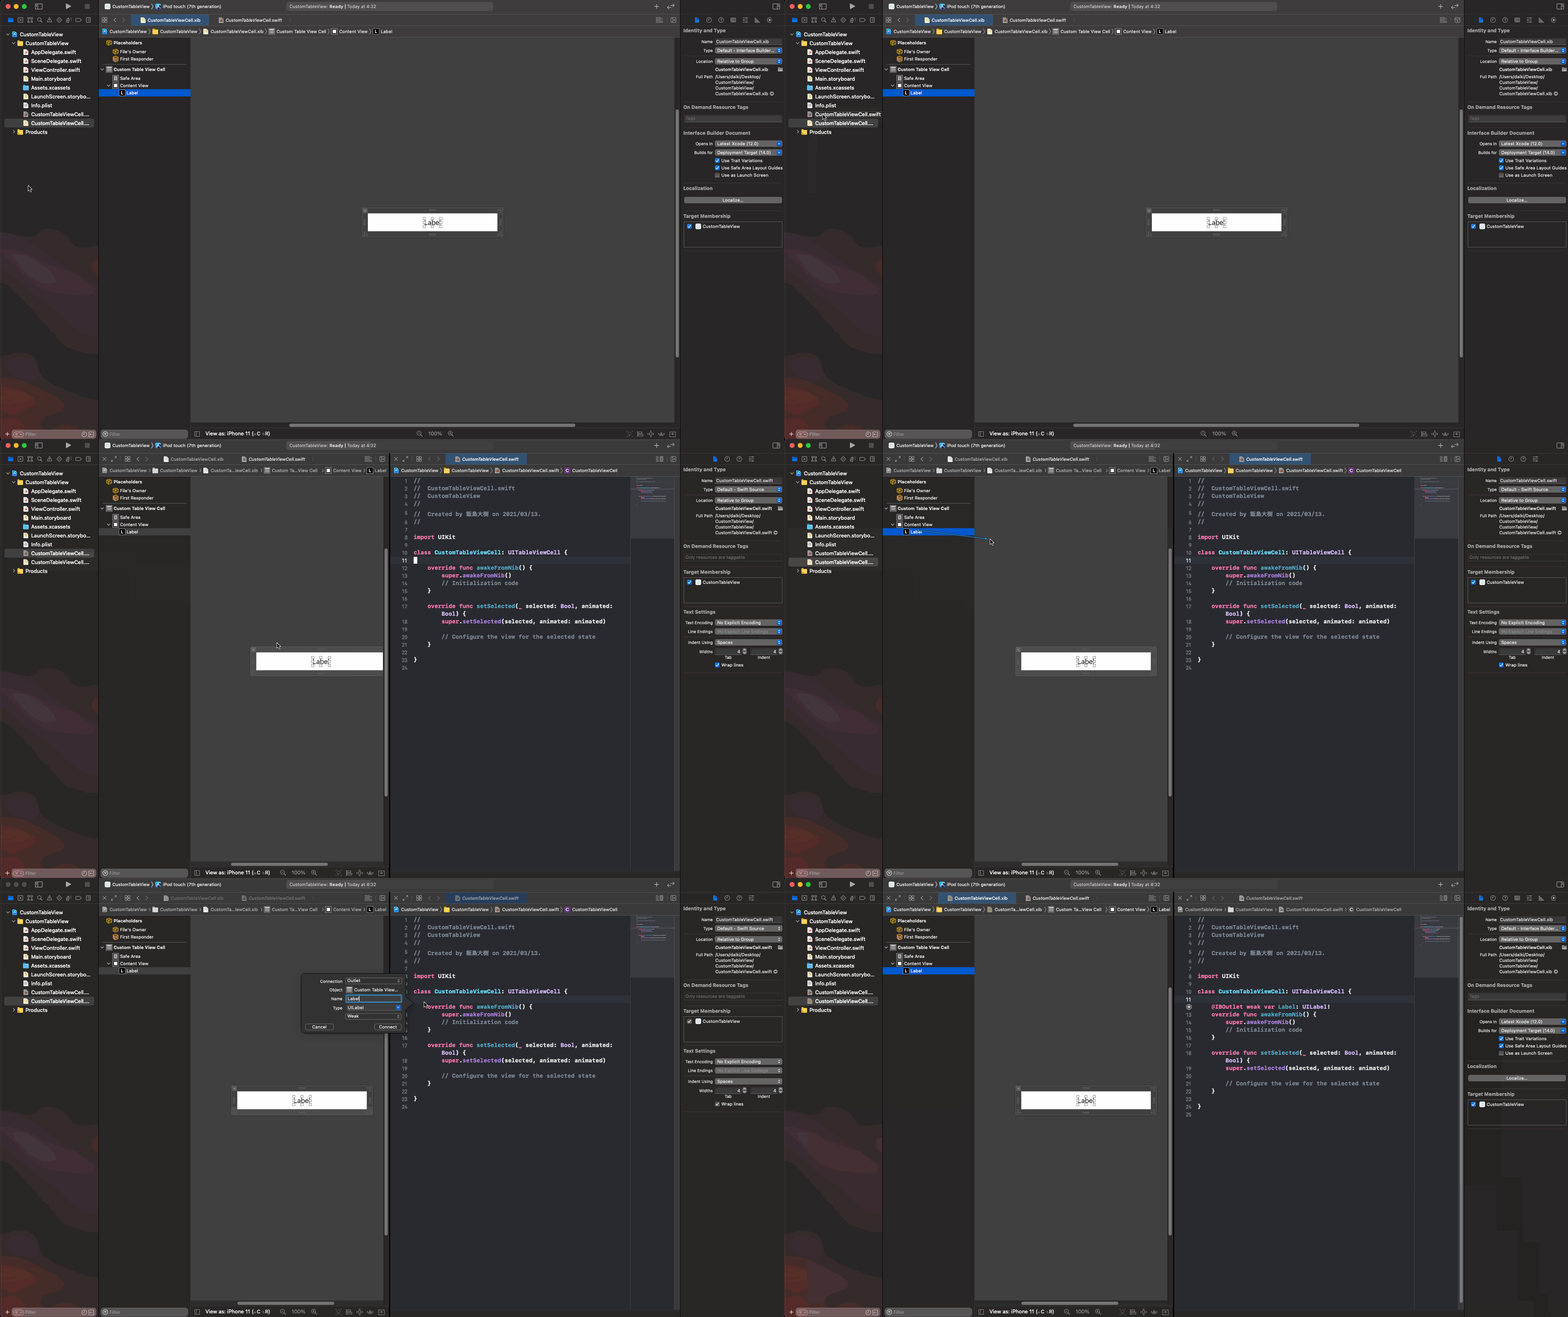
ラベル参照

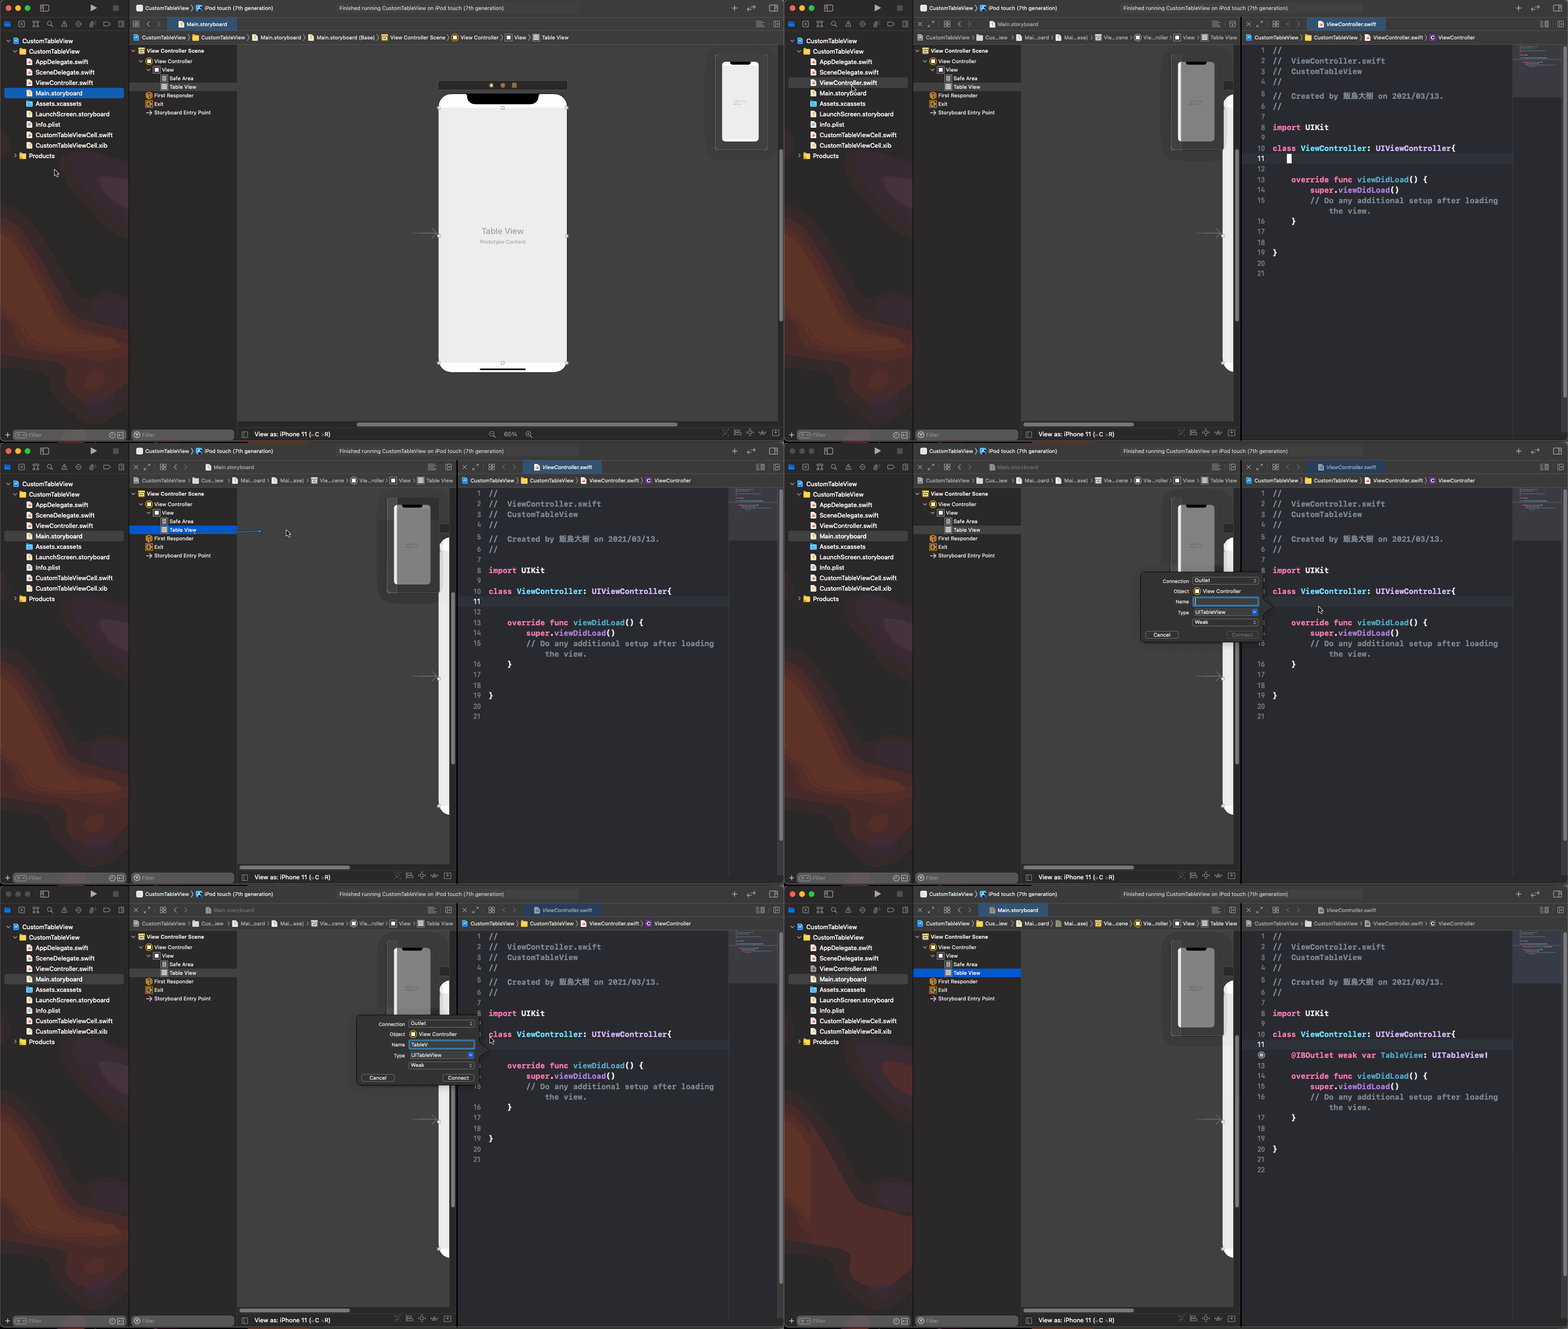
5. Main.storyboardを編集

Table Viewを追加
TableVIew

6. ViewController.swiftを編集

Main.storyboardで指定した、Table Viewの参照を設定

  • 参照時の変数名を今回はTableViewとする

TableView参照

viewDidLoad()に追記

  • UITableViewに対して、delegateと使用するCellの情報を設定
    • TableView.register : 使用するカスタムセルの情報を登録
      • nibName = 作ったCellのクラス名
      • forCellReuseIdentifier = xibで指定したidentifier名
    • TableView.delegate :
    • TableView.dataSorce :
1
2
3
4
5
6
7
8
9
10
override func viewDidLoad() {
super.viewDidLoad()
// Do any additional setup after loading the view.

// ここから
TableView.register(UINib(nibName: "CustomTableViewCell", bundle: nil), forCellReuseIdentifier: "CustomCell")
TableView.delegate = self
TableView.dataSource = self
// ここまで
}

UITableViewDelegate,UITableViewDataSourceを継承

  • どちらのメソッドも、optionalなので、最低限のメソッドの定義をすれば、他のメソッドは定義しなくてもいい
  • UITableViewDelegate : TableView内のデータが選択や生成、編集されたときに呼び出されるメソッドが定義されたプロトコル群
  • UITableViewDataSource : テーブルに表示させたいデータを設定するためのプロトコル群
1
2
3
class ViewController: UIViewController,UITableViewDelegate,UITableViewDataSource {
...
}

継承すると、エラーが出るはずなので、Fixをクリックしてメソッドを2つ自動生成してもらうと、以下のようなメソッドが自動生成されるはず

1
2
3
4
5
6
7
8
9
10
11
//	UITableViewDelegateの継承によって生成された
// TableViewに生成するセル数を設定する(Int型を返す)
func tableView(_ tableView: UITableView, numberOfRowsInSection section: Int) -> Int {
Code
}

// UITableViewDataSourceの継承によって生成された
// TableViewに表示するセルのデータを設定する(UITableViewCellを返す)
func tableView(_ tableView: UITableView, cellForRowAt indexPath: IndexPath) -> UITableViewCell {
Code
}

今回は、生成するセルを10個、表示するデータを各セルを上から数えたときの番号にする

1
2
3
4
5
6
7
8
9
10
11
func tableView(_ tableView: UITableView, numberOfRowsInSection section: Int) -> Int {
return 10
}

func tableView(_ tableView: UITableView, cellForRowAt indexPath: IndexPath) -> UITableViewCell {
let cell = tableView.dequeueReusableCell(withIdentifier: "CustomCell",for: indexPath) as! CustomTableViewCell

cell.Label.text = String(indexPath.row)

return cell
}

実行した結果
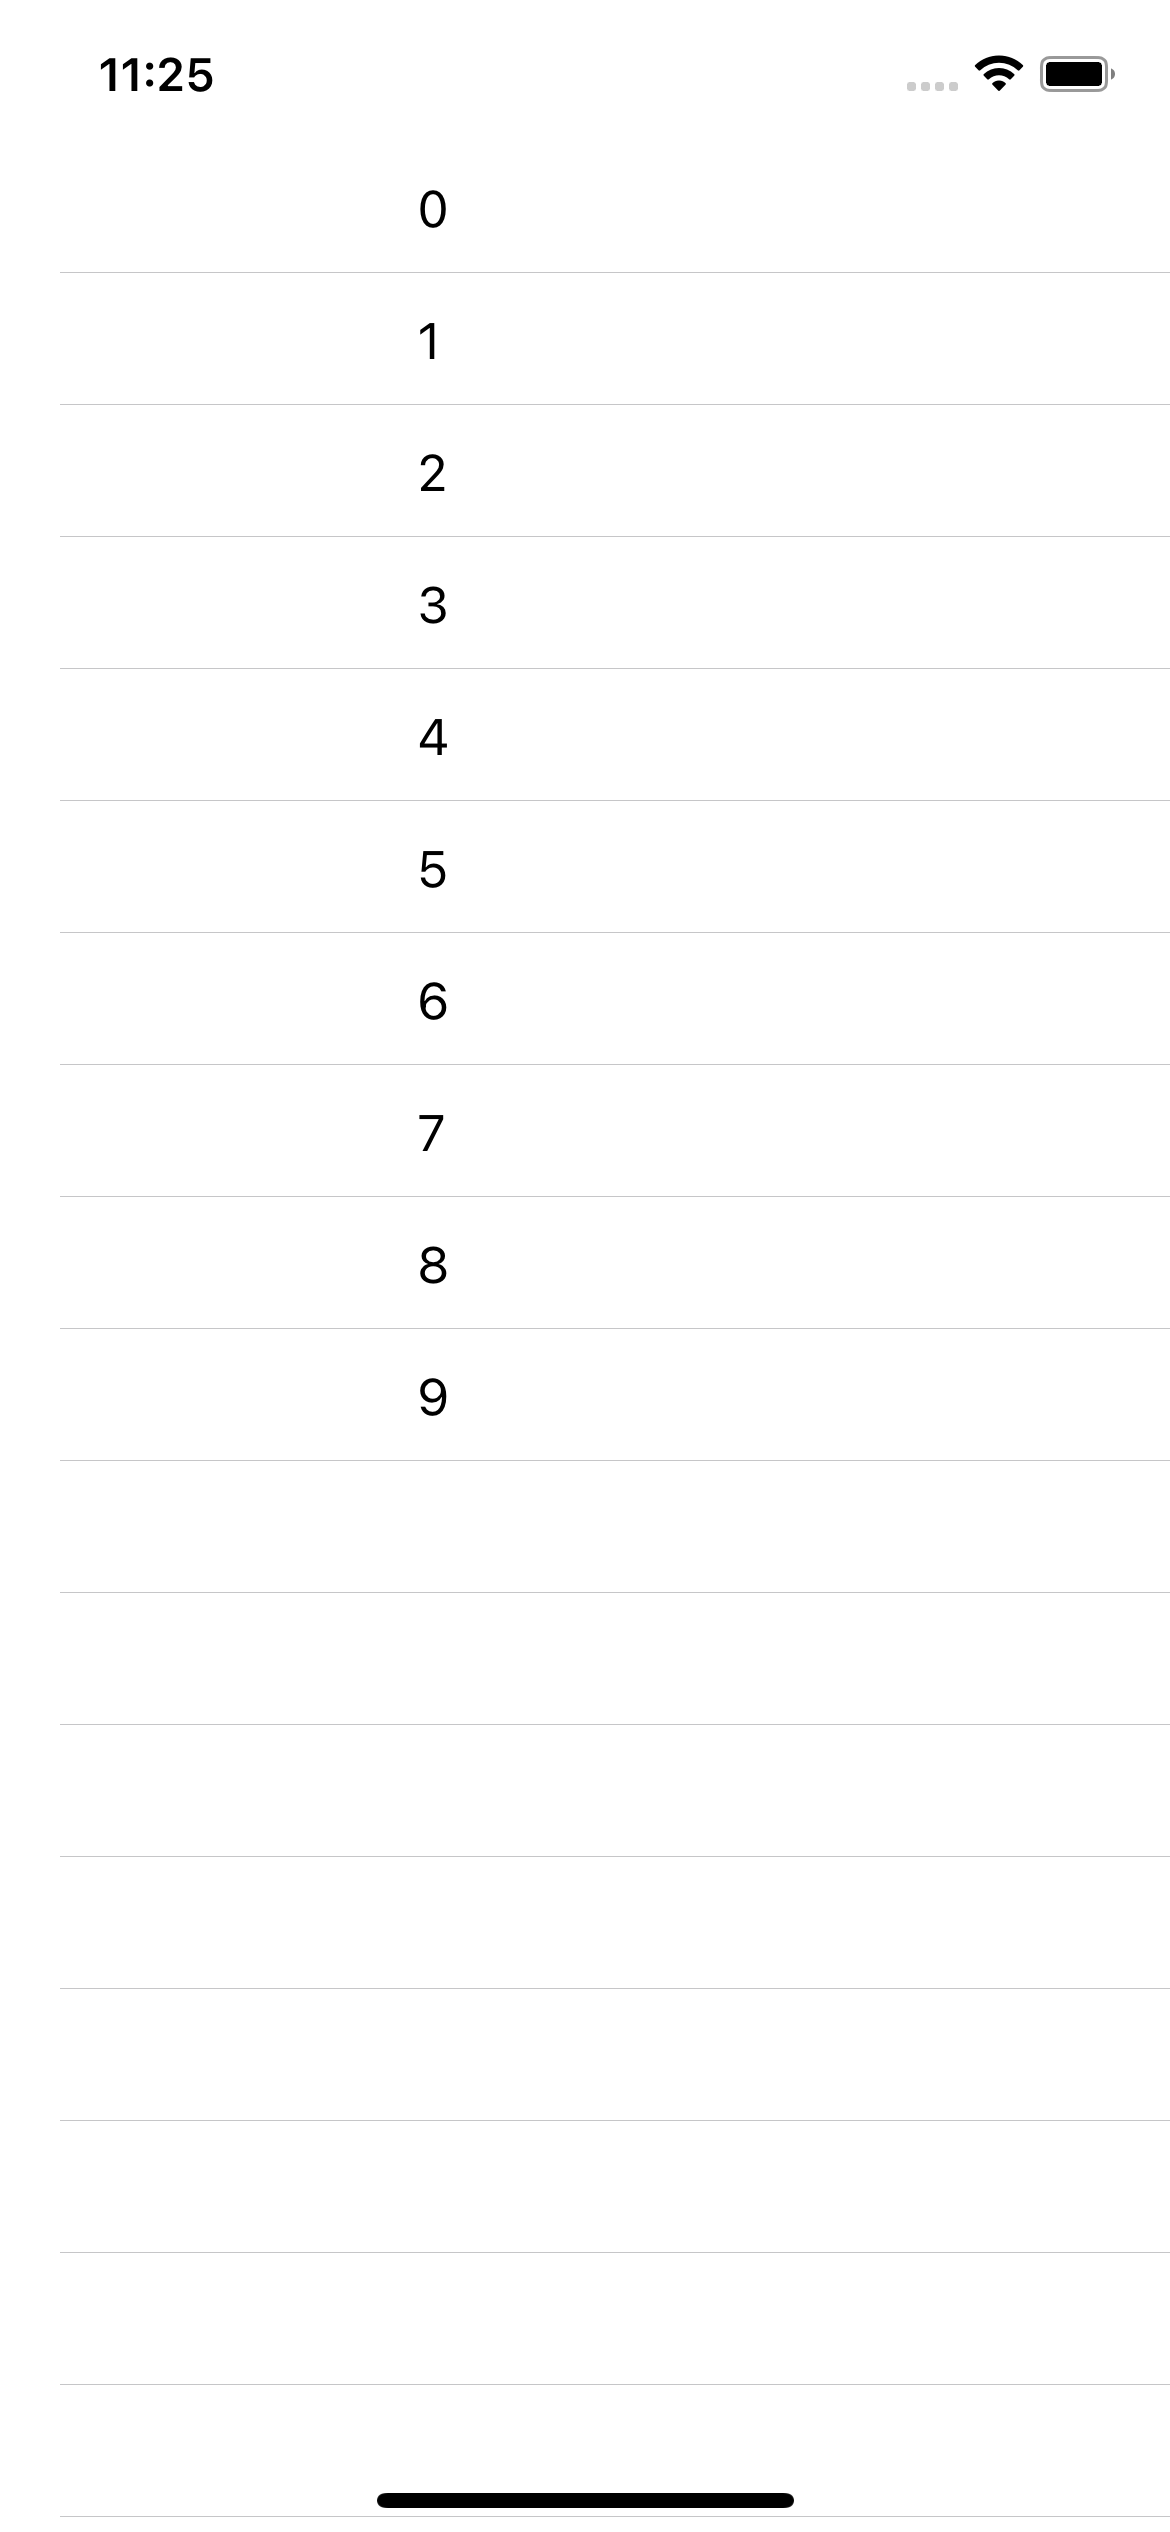
完成

ViewController.swiftの完成形

1
2
3
4
5
6
7
8
9
10
11
12
13
14
15
16
17
18
19
20
21
22
23
24
25
26
27
28
29
30
import UIKit

class ViewController: UIViewController,UITableViewDelegate,UITableViewDataSource {


@IBOutlet weak var TableView: UITableView!

func tableView(_ tableView: UITableView, numberOfRowsInSection section: Int) -> Int {
return 10
}

func tableView(_ tableView: UITableView, cellForRowAt indexPath: IndexPath) -> UITableViewCell {
let cell = tableView.dequeueReusableCell(withIdentifier: "CustomCell",for: indexPath) as! CustomTableViewCell

cell.Label.text = String(1)

return cell
}


override func viewDidLoad() {
super.viewDidLoad()
// Do any additional setup after loading the view.
TableView.register(UINib(nibName: "CustomTableViewCell", bundle: nil), forCellReuseIdentifier: "CustomCell")
TableView.delegate = self
TableView.dataSource = self
}


}

【Swift】Array内の要素を指定して消去する

もくじ

  1. removeAllを使用する
    • 短くかける
  2. for文を使用する
    • ちょっと冗長
  3. その他の参考

注意

この方法の場合、比較する要素に一致するデータは全て配列から消去されます

1.removeAllを使用する

removeAll(where:)メソッドを使用し、要素を比較して一致している値全てを消去する

1
2
3
4
5
6
7
8
9
//	配列定義
var testArray :Array<String> = Array<String>()

// 要素追加
testArray.append("test")
testArray.append("kemono")

// testと一致する要素を全て消去
testArray.removeAll(where: {$0 == "test"})

2.for文を使用する

for文を使用して配列内の要素を列挙して、要素を比較した結果一致している配列内要素を全て消去する

1
2
3
4
5
6
7
8
9
10
11
12
13
14
15
16
17
//	配列定義
var testArray :Array<String> = Array<String>()

// 要素追加
testArray.append("test")
testArray.append("kemono")

// 要素を操作するのでコピーを作成して、それをfor文で列挙する
let copyArray = testArray

// 一致する要素を消去
for i in 0...copyArray.count - 1{
if(copyArray[i] == "test"){
testArray.remove(at: i)
}
}

3.その他の参考

【Xcode】EntryPointを変更する方法

もくじ

  1. 環境
  2. Entry Pointとは
  3. StoryBordから変更する
  4. コードから変更する
  5. [おまけ]初回起動時のみ特定の画面を表示させる

0. 環境

  • MacBook Air M1
  • Xcode 12.4

1. Entry Pointとは

  • プログラムの開始される位置
  • この記事では開始される画面の位置も含まれる

画面上で見ると以下の画像の矢印部分がEntry Pointを表している

EntryPointの矢印

アシスタントエディタで確認すると以下赤枠部分

EntryPointのアシスタントエリアでの表示

2. StoryBordから変更する

ドラックアンドドロップで矢印を移動させる

EntryPoint変更(マウス).gif

Utilites areaから移動させる

Attributes inspector内Is Initial View Controllerにチェクを入れる
EntryPoint変更(Inspector)

3. コードから変更する

1. Main.storybordの遷移させたいViewControllerにStoryboad IDを設定する

  • Identity Inspector 内のSotryboard IDを設定

Inspector.png

  • 今回はこのように設定
    • 1画面目 : FirstView
    • 2画面目 : SecondView

2. SceneDelegate.swift

  1. 何も変更していないデフォルトの状態だとこのようなコードになっていると思います

    1
    2
    3
    4
    5
    6
    7
    8
    9
    10
    11
    12
    13
    14
    15
    16
    17
    18
    19
    20
    21
    22
    23
    24
    25
    26
    27
    28
    29
    30
    31
    32
    33
    34
    35
    36
    37
    38
    39
    40
    41
    42
    43
    44
    import UIKit

    class SceneDelegate: UIResponder, UIWindowSceneDelegate {

    var window: UIWindow?


    func scene(_ scene: UIScene, willConnectTo session: UISceneSession, options connectionOptions: UIScene.ConnectionOptions) {
    // Use this method to optionally configure and attach the UIWindow `window` to the provided UIWindowScene `scene`.
    // If using a storyboard, the `window` property will automatically be initialized and attached to the scene.
    // This delegate does not imply the connecting scene or session are new (see `application:configurationForConnectingSceneSession` instead).
    guard let _ = (scene as? UIWindowScene) else { return }
    }

    func sceneDidDisconnect(_ scene: UIScene) {
    // Called as the scene is being released by the system.
    // This occurs shortly after the scene enters the background, or when its session is discarded.
    // Release any resources associated with this scene that can be re-created the next time the scene connects.
    // The scene may re-connect later, as its session was not necessarily discarded (see `application:didDiscardSceneSessions` instead).
    }

    func sceneDidBecomeActive(_ scene: UIScene) {
    // Called when the scene has moved from an inactive state to an active state.
    // Use this method to restart any tasks that were paused (or not yet started) when the scene was inactive.
    }

    func sceneWillResignActive(_ scene: UIScene) {
    // Called when the scene will move from an active state to an inactive state.
    // This may occur due to temporary interruptions (ex. an incoming phone call).
    }

    func sceneWillEnterForeground(_ scene: UIScene) {
    // Called as the scene transitions from the background to the foreground.
    // Use this method to undo the changes made on entering the background.
    }

    func sceneDidEnterBackground(_ scene: UIScene) {
    // Called as the scene transitions from the foreground to the background.
    // Use this method to save data, release shared resources, and store enough scene-specific state information
    // to restore the scene back to its current state.
    }


    }
  2. sceneメソッド内に以下のコードのコードを追記します

    • この時、guard let _ =_の部分をwindowに変更しています。
    1
    2
    3
    4
    5
    6
    7
    8
    9
    10
    11
    12
    13
    14
    15
    16
    17
    18
    19
    func scene(_ scene: UIScene, willConnectTo session: UISceneSession, options connectionOptions: UIScene.ConnectionOptions) {
    // Use this method to optionally configure and attach the UIWindow `window` to the provided UIWindowScene `scene`.
    // If using a storyboard, the `window` property will automatically be initialized and attached to the scene.
    // This delegate does not imply the connecting scene or session are new (see `application:configurationForConnectingSceneSession` instead).
    guard let windowScene = (scene as? UIWindowScene) else { return }

    window = UIWindow(windowScene: windowScene)
    let storybard = UIStoryboard(name: "Main",bundle: nil)

    // 初めて起動しているか
    if(lanchIsFIrstTme()){
    window?.rootViewController = storybard.instantiateViewController(identifier: "FirstView")
    firstLanch()
    }else{
    window?.rootViewController = storybard.instantiateViewController(identifier: "SecondView")
    }

    window?.makeKeyAndVisible()
    }

4. [おまけ]初回起動時のみ特定の画面を表示させる

一つ前で実装した切り替え処理とユーザーデフォルト機能を組み合わせて、初回起動かどうかを判定する

  • 確認用メソッドと登録用メソッドを作成

    1
    2
    3
    4
    5
    6
    7
    8
    9
    private let STORED_KEY = "lanched"

    func firstLanch(){
    return UserDefaults.standard.set(true,forKey: STORED_KEY)
    }

    func lanchIsFIrstTme() -> Bool{
    return !UserDefaults.standard.bool(forKey: STORED_KEY)
    }
  • 一つ前で実装したコードを改変

    1
    2
    3
    4
    5
    6
    7
    8
    9
    10
    11
    12
    13
    14
    15
    16
    17
    18
    19
    func scene(_ scene: UIScene, willConnectTo session: UISceneSession, options connectionOptions: UIScene.ConnectionOptions) {
    // Use this method to optionally configure and attach the UIWindow `window` to the provided UIWindowScene `scene`.
    // If using a storyboard, the `window` property will automatically be initialized and attached to the scene.
    // This delegate does not imply the connecting scene or session are new (see `application:configurationForConnectingSceneSession` instead).
    guard let windowScene = (scene as? UIWindowScene) else { return }

    window = UIWindow(windowScene: windowScene)
    let storybard = UIStoryboard(name: "Main",bundle: nil)

    // 初めて起動しているか
    if(lanchIsFIrstTme()){
    window?.rootViewController = storybard.instantiateViewController(identifier: "FirstView")
    firstLanch()
    }else{
    window?.rootViewController = storybard.instantiateViewController(identifier: "SecondView")
    }

    window?.makeKeyAndVisible()
    }

こんな感じになればOK

最終確認

参考

https://stackoverflow.com/questions/10428629/programmatically-set-the-initial-view-controller-using-storyboards/47691073