【Xcode】EntryPointを変更する方法

もくじ

  1. 環境
  2. Entry Pointとは
  3. StoryBordから変更する
  4. コードから変更する
  5. [おまけ]初回起動時のみ特定の画面を表示させる

0. 環境

  • MacBook Air M1
  • Xcode 12.4

1. Entry Pointとは

  • プログラムの開始される位置
  • この記事では開始される画面の位置も含まれる

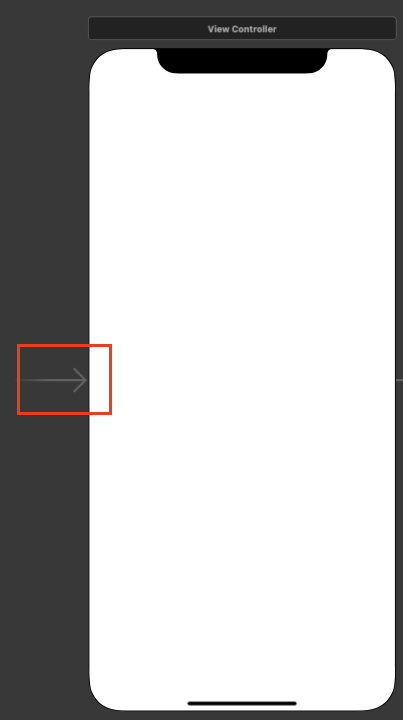
    画面上で見ると以下の画像の矢印部分がEntry Pointを表している

    EntryPointの矢印

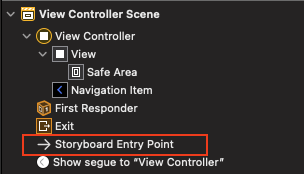
アシスタントエディタで確認すると以下赤枠部分

EntryPointのアシスタントエリアでの表示

2. StoryBordから変更する

ドラックアンドドロップで矢印を移動させる

EntryPoint変更(マウス).gif.gif “EntryPoint変更(マウス)”)

Utilites areaから移動させる

Attributes inspector内Is Initial View Controllerにチェクを入れる
EntryPoint変更(Inspector).gif “EntryPoint変更(Inspector)”)

3. コードから変更する

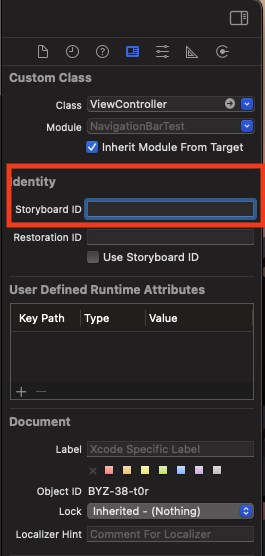
1. Main.storybordの遷移させたいViewControllerにStoryboad IDを設定する

  • Identity Inspector 内のSotryboard IDを設定

Inspector.png

  • 今回はこのように設定
    • 1画面目 : FirstView
    • 2画面目 : SecondView

2. SceneDelegate.swift

  1. 何も変更していないデフォルトの状態だとこのようなコードになっていると思います
    1
    2
    3
    4
    5
    6
    7
    8
    9
    10
    11
    12
    13
    14
    15
    16
    17
    18
    19
    20
    21
    22
    23
    24
    25
    26
    27
    28
    29
    30
    31
    32
    33
    34
    35
    36
    37
    38
    39
    40
    41
    42
    43
    44
    import UIKit

    class SceneDelegate: UIResponder, UIWindowSceneDelegate {

    var window: UIWindow?


    func scene(_ scene: UIScene, willConnectTo session: UISceneSession, options connectionOptions: UIScene.ConnectionOptions) {
    // Use this method to optionally configure and attach the UIWindow `window` to the provided UIWindowScene `scene`.
    // If using a storyboard, the `window` property will automatically be initialized and attached to the scene.
    // This delegate does not imply the connecting scene or session are new (see `application:configurationForConnectingSceneSession` instead).
    guard let _ = (scene as? UIWindowScene) else { return }
    }

    func sceneDidDisconnect(_ scene: UIScene) {
    // Called as the scene is being released by the system.
    // This occurs shortly after the scene enters the background, or when its session is discarded.
    // Release any resources associated with this scene that can be re-created the next time the scene connects.
    // The scene may re-connect later, as its session was not necessarily discarded (see `application:didDiscardSceneSessions` instead).
    }

    func sceneDidBecomeActive(_ scene: UIScene) {
    // Called when the scene has moved from an inactive state to an active state.
    // Use this method to restart any tasks that were paused (or not yet started) when the scene was inactive.
    }

    func sceneWillResignActive(_ scene: UIScene) {
    // Called when the scene will move from an active state to an inactive state.
    // This may occur due to temporary interruptions (ex. an incoming phone call).
    }

    func sceneWillEnterForeground(_ scene: UIScene) {
    // Called as the scene transitions from the background to the foreground.
    // Use this method to undo the changes made on entering the background.
    }

    func sceneDidEnterBackground(_ scene: UIScene) {
    // Called as the scene transitions from the foreground to the background.
    // Use this method to save data, release shared resources, and store enough scene-specific state information
    // to restore the scene back to its current state.
    }


    }
  2. sceneメソッド内に以下のコードのコードを追記します

    • この時、guard let _ =_の部分をwindowに変更しています。

      1
      2
      3
      4
      5
      6
      7
      8
      9
      10
      11
      12
      13
      14
      15
      16
      17
      18
      19
      func scene(_ scene: UIScene, willConnectTo session: UISceneSession, options connectionOptions: UIScene.ConnectionOptions) {
      // Use this method to optionally configure and attach the UIWindow `window` to the provided UIWindowScene `scene`.
      // If using a storyboard, the `window` property will automatically be initialized and attached to the scene.
      // This delegate does not imply the connecting scene or session are new (see `application:configurationForConnectingSceneSession` instead).
      guard let windowScene = (scene as? UIWindowScene) else { return }

      window = UIWindow(windowScene: windowScene)
      let storybard = UIStoryboard(name: "Main",bundle: nil)

      // 初めて起動しているか
      if(lanchIsFIrstTme()){
      window?.rootViewController = storybard.instantiateViewController(identifier: "FirstView")
      firstLanch()
      }else{
      window?.rootViewController = storybard.instantiateViewController(identifier: "SecondView")
      }

      window?.makeKeyAndVisible()
      }

4. [おまけ]初回起動時のみ特定の画面を表示させる

一つ前で実装した切り替え処理とユーザーデフォルト機能を組み合わせて、初回起動かどうかを判定する

  • 確認用メソッドと登録用メソッドを作成

    1
    2
    3
    4
    5
    6
    7
    8
    9
    private let STORED_KEY = "lanched"

    func firstLanch(){
    return UserDefaults.standard.set(true,forKey: STORED_KEY)
    }

    func lanchIsFIrstTme() -> Bool{
    return !UserDefaults.standard.bool(forKey: STORED_KEY)
    }
  • 一つ前で実装したコードを改変

    1
    2
    3
    4
    5
    6
    7
    8
    9
    10
    11
    12
    13
    14
    15
    16
    17
    18
    19
    func scene(_ scene: UIScene, willConnectTo session: UISceneSession, options connectionOptions: UIScene.ConnectionOptions) {
    // Use this method to optionally configure and attach the UIWindow `window` to the provided UIWindowScene `scene`.
    // If using a storyboard, the `window` property will automatically be initialized and attached to the scene.
    // This delegate does not imply the connecting scene or session are new (see `application:configurationForConnectingSceneSession` instead).
    guard let windowScene = (scene as? UIWindowScene) else { return }

    window = UIWindow(windowScene: windowScene)
    let storybard = UIStoryboard(name: "Main",bundle: nil)

    // 初めて起動しているか
    if(lanchIsFIrstTme()){
    window?.rootViewController = storybard.instantiateViewController(identifier: "FirstView")
    firstLanch()
    }else{
    window?.rootViewController = storybard.instantiateViewController(identifier: "SecondView")
    }

    window?.makeKeyAndVisible()
    }

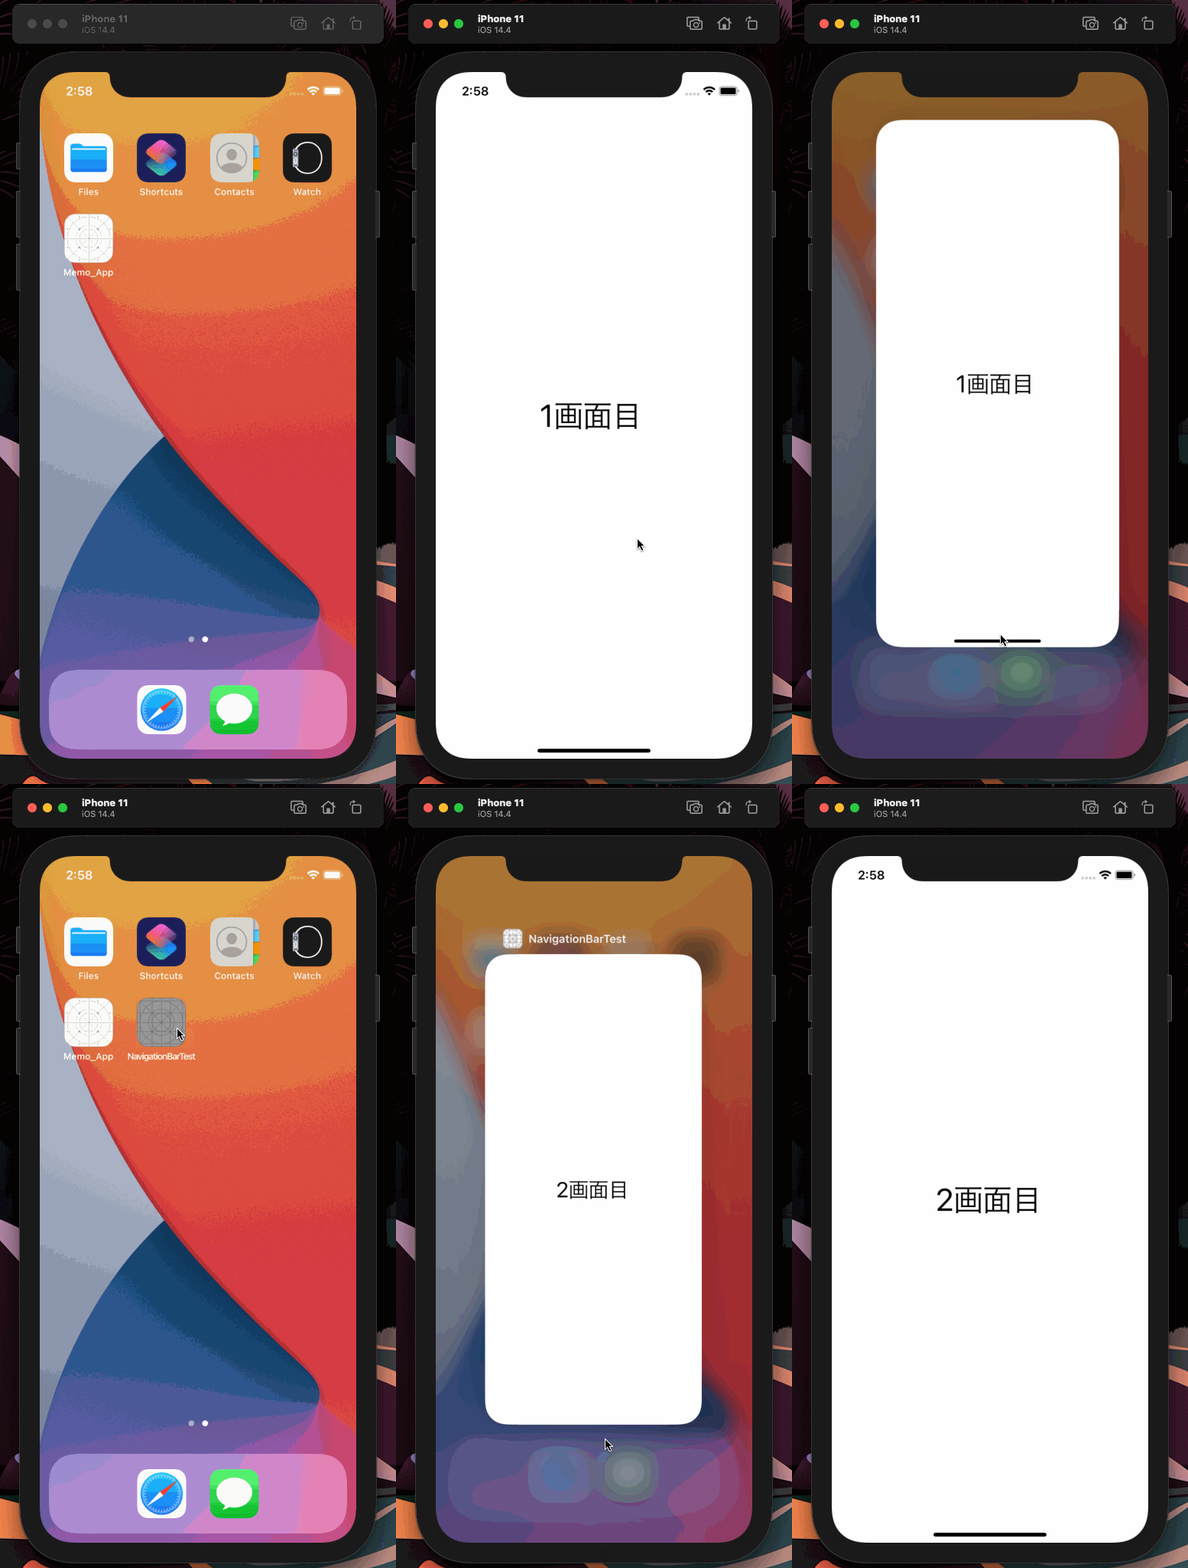
    こんな感じになればOK

    最終確認

    参考

    https://stackoverflow.com/questions/10428629/programmatically-set-the-initial-view-controller-using-storyboards/47691073

自作ソート【Swift】

目的

  • ソートアルゴリズムの基本を身につける
  • Swiftになれる

要件

  • 数字をソートアルゴリズムを使ってソートする(Swiftのソート関数は使わない)
  • 日本語ひらがな、アルファベット小文字の1文字をソートする
  • インプットは数字の場合と、文字の場合がある (ただし、文字と数字の組み合わせはない、どちらか1種類のみの羅列が入力される)
  • 最後に昇順 or 降順の指定がある
  • ユーザーは決まった手順を守るとは限らないので、その場合の例外の対応方法の組み込み (無理矢理処理しても、エラーを返してもいい)k

コード

1
2
3
4
5
6
7
8
9
10
11
12
13
14
15
16
17
18
19
20
21
22
23
24
25
26
27
28
29
30
31
32
33
34
35
36
37
38
39
40
41
42
43
44
45
46
47
48
49
50
51
52
53
54
55
56
57
58
59
60
61
62
63
64
65
66
67
68
69
70
71
72
73
74
75
76
77
78
79
80
81
82
83
84
85
86
87
88
89
90
91
92
93
94
95
96
97
98
99
100
101
102
103
104
105
106
107
108
109
110
111
112
113
114
115
116
117
118
119
120
121
122
123
124
125
126
127
128
129
130
131
132
133
134
135
136
137
138
139
140
141
142
143
144
145
146
147
148
149
150
151
152
153
154
155
156
157
158
159
160
161
162
163
164
165
166
167
168
169
170
171
172
173
174
175
176
177
178
179
180
181
182
183
184
185
186
187
188
189
190
191
192
193
194
import UIKit

let testValue1:String = "24,6723,23,111,43,1,昇順"
let testValue2:String = "え,い,う,か,と,昇順"
let testValue3:String = "-2,-22347999,あ,2,い,3,-1,ああ,昇順"

enum OrderType:String{
case none = "例外"
case ascending = "昇順"
case descending = "降順"
}

enum ValueType:String{
case Iregular = "例外"
case Number = "数字"
case Charactor = "ローマ字"
case Japanese = "日本語"
}

// ============= メイン処理 ==============
// 入力された文字列を分割
var inputValueList = testValue3.split(separator: ",")

// ソートタイプのチェック
var orderType:OrderType = OrderType(rawValue: String(inputValueList.last ?? "")) ?? OrderType.none

if(orderType == OrderType.none){
print("ソート方法を指定してください")
print("指定がないため、昇順ソートを行います")

orderType = OrderType.ascending
}else{
// ソート指定は邪魔なので取り除く
inputValueList.removeLast()
}

// 入力文字列のタイプを判定
let valueType = CheckValueType(targetValueList: inputValueList)

// ソート処理
var sortedNumberList:Array<Substring> = Array<Substring>()
sortedNumberList = Sort(targetNumberList:inputValueList)

// 何をソートしたか表示
switch valueType {
case .Number:
print(ValueType.Number.rawValue + "ソート完了")
case .Charactor:
print(ValueType.Charactor.rawValue + "ソート完了")
case .Japanese:
print(ValueType.Japanese.rawValue + "ソート完了")
case .Iregular:
print(ValueType.Iregular.rawValue + "ソート完了")
}

// ソートタイプによって出力を切り替え
switch orderType {
case .ascending:
print(sortedNumberList)
case .descending:
print(Array(sortedNumberList.reversed()))
case .none:
print("ソート失敗")
}

// =====================================

// ============== メソッド ===============
// 値のタイプを判定
func CheckValueType(targetValueList:Array<Substring>)-> ValueType{
var retVal : ValueType = ValueType.Iregular
let targetValueCount = targetValueList.count

var numberCount = 0
var charCount = 0
var japaneseCount = 0

// 数字の並びかチェック
for i in 0...inputValueList.count - 1{
let str:Int = Int(inputValueList[i].cString(using: .shiftJIS)!.first!)
if(str >= 48 && str <= 57){ // 数字
numberCount += 1
}else if(str >= 97 && str <= 122){ // 小文字
charCount += 1
}else if(str >= 65 && str <= 90){ // 大文字
charCount += 1
}else if(str == -125){ // ひらがな
japaneseCount += 1
}else if(str == -126){ // カタカナ
japaneseCount += 1
}
}


if(numberCount == targetValueCount){
retVal = ValueType.Number
}else if(charCount == targetValueCount){
retVal = ValueType.Charactor
}else if(japaneseCount == targetValueCount){
retVal = ValueType.Japanese
}else{
retVal = ValueType.Iregular
}

return retVal
}

// ソート処理
func Sort(targetNumberList:Array<Substring>)->Array<Substring>{

var sortList = targetNumberList
var isChange = false

for index in 0...sortList.count - 1{

if(index + 1 == sortList.count)
{
break
}

let firstList = sortList[index].cString(using: .shiftJIS)!
var firstSign = 1
var firstJapaneseSign = 0

let firstCheckValue = firstList.first!
if(firstCheckValue == 45 ) // マイナス符号
{
firstSign = -1
}

if(firstCheckValue == -125 || // ひらがな
firstCheckValue == -126) // カタカナ
{
firstJapaneseSign = Int(firstCheckValue) * -1
}


var first:Int = 0

for fc in firstList{
first += Int(fc) * firstSign
}

if(firstJapaneseSign != 0){
first *= firstJapaneseSign
}


let secondList = sortList[index+1].cString(using: .shiftJIS)!

var secondSign = 1
var secondJapaneseCheckSign = 0

let secondCheckValue = secondList.first!
if(secondCheckValue == 45) // マイナス符号
{
secondSign = -1
}

if(secondCheckValue == -125 || // ひらがな
secondCheckValue == -126) // カタカナ
{
secondJapaneseCheckSign = Int(secondCheckValue) * -1
}
var second:Int = 0

for sc in secondList{
second += Int(sc) * secondSign
}

if(secondJapaneseCheckSign != 0){
second *= secondJapaneseCheckSign
}


let firstValue = sortList[index]
let secondValue = sortList[index+1]

if(first > second)
{
isChange = true

sortList[index] = secondValue
sortList[index + 1] = firstValue
}
}

if(isChange){
sortList = Sort(targetNumberList: sortList)
}

return sortList
}
// =======================================

備考(感想)

  • 文字コード変換する時に全てShiftJISのコードで変換されてしまった(未解決)
  • 今回使ったソートアルゴリズムは「バブルソート」
  • 小数に対応していない

Swiftで迷路を解く

目的

  • Swiftの勉強

制作時間

  • 4時間

コード

1
2
3
4
5
6
7
8
9
10
11
12
13
14
15
16
17
18
19
20
21
22
23
24
25
26
27
28
29
30
31
32
33
34
35
36
37
38
39
40
41
42
43
44
45
46
47
48
49
50
51
52
53
54
55
56
57
58
59
60
61
62
63
64
65
66
67
68
69
70
71
72
73
74
75
76
77
78
79
80
81
82
83
84
85
86
87
88
89
90
91
92
93
94
95
96
97
98
99
100
101
102
103
104
105
106
107
108
109
110
111
112
113
114
115
116
117
118
119
120
121
122
123
124
125
126
127
128
129
130
131
132
133
134
135
136
137
138
139
140
141
142
143
144
145
146
147
148
149
150
151
152
153
154
155
156
157
158
159
160
161
162
163
164
165
166
167
168
169
170
171
172
173
174
175
176
177
178
179
180
181
182
183
184
185
186
187
188
189
190
191
192
193
194
195
196
197
198
199
200
201
202
203
204
205
206
207
208
209
210
211
212
213
214
215
216
217
218
219
220
221
222
223
224
225
226
227
228
229
230
231
232
233
234
235
236
237
238
239
240
241
242
243
244
245
246
247
248
249
250
251
252
253
254
255
256
257
258
259
260
261
262
263
264
265
266
267
268
269
270
271
272
273
274
275
276
277
278
279
280
281
282
283
284
import UIKit

var targetMaze = [
["#","S","#","#","#","#","#","#","#","#","#"],
["#"," ","#","#","#","#","#","#"," ","#","#"],
["#"," "," "," "," ","#","#"," "," ","#","#"],
["#"," ","#","#"," "," "," "," ","#","#","#"],
["#","#","#","#"," ","#","#","#","#","#","#"],
["#"," "," "," "," ","#"," "," "," ","#","#"],
["#"," ","#","#","#","#"," ","#"," ","#","#"],
["#"," ","#","#","#","#"," ","#"," ","#","#"],
["#"," "," "," "," "," "," ","#"," ","#","#"],
["#","#","#","#","#","#","#","#","G","#","#"]
]

enum MapType:String
{
case Start = "S"
case Goal = "G"
case Wall = "#"
case Root = "+"
}

struct Vec2:Equatable{
var X:Int = 0
var Y:Int = 0
}

struct Direction
{
var Now:Vec2

var Up:Vec2?
var Down:Vec2?
var Right:Vec2?
var Left:Vec2?
}

func CheckRoad(maze:[[String]],pos:Vec2?,beforPos:Vec2,maxPos:Vec2,checkType:MapType)-> Direction?
{
if(pos == nil) {
return nil
}

// 上,右,下,左
var retPos:Direction = Direction(Now:pos!,Up:nil,Down: nil,Right: nil,Left: nil)

// 上下左右の座標を取得
let minusY = retPos.Now.Y - 1
let plusY = retPos.Now.Y + 1
let minusX = retPos.Now.X - 1
let plusX = retPos.Now.X + 1

// マップ内かチェック
if(minusY >= 0){
retPos.Down = Vec2()
}
if(plusY < maxPos.Y){
retPos.Up = Vec2()
}
if(minusX >= 0){
retPos.Left = Vec2()
}
if(plusX < maxPos.X){
retPos.Right = Vec2()
}

// 壁があるかチェック
if(retPos.Down == Vec2() &&
(maze[minusY][retPos.Now.X] != checkType.rawValue) &&
beforPos != Vec2(X: retPos.Now.X, Y: minusY))
{
retPos.Down = Vec2(X:retPos.Now.X,Y:minusY)
}
else{
retPos.Down = nil
}

if(retPos.Up == Vec2() &&
(maze[plusY][retPos.Now.X] != checkType.rawValue) &&
beforPos != Vec2(X: retPos.Now.X, Y: plusY))
{
retPos.Up = Vec2(X:retPos.Now.X,Y:plusY)
}else{
retPos.Up = nil
}

if(retPos.Left == Vec2() &&
(maze[retPos.Now.Y][minusX] != checkType.rawValue) &&
beforPos != Vec2(X: minusX, Y: retPos.Now.Y))
{
retPos.Left = Vec2(X:minusX,Y:retPos.Now.Y)
}else{
retPos.Left = nil
}

if(retPos.Right == Vec2() &&
(maze[retPos.Now.Y][plusX] != checkType.rawValue) &&
beforPos != Vec2(X: plusX, Y: retPos.Now.Y))
{
retPos.Right = Vec2(X:plusX,Y:retPos.Now.Y)
}else{
retPos.Right = nil
}


return retPos
}

// 指定したターゲットの位置を返す
// 見つからなかった場合は、nilが返えってくる
func serchTargetPoint(maze:[[String]],targetMapType:MapType)->Vec2?
{
var retPos:Vec2? = nil

let mazeYCount = maze.count - 1
let mazeXCount = maze[0].count - 1

for Y in 0...mazeYCount
{
for X in 0...mazeXCount{
let checkValue = maze[Y][X]

if(checkValue == targetMapType.rawValue)
{
retPos = Vec2(X:X,Y:Y)
}
}
}

return retPos
}

func printMaze(maze:[[String]]){

let mazeYCount = maze.count - 1
let mazeXCount = maze[0].count - 1

for Y in 0...mazeYCount
{
print("\n")
for X in 0...mazeXCount{
print(maze[Y][X], terminator: "")
}
}

print("\n")
}


printMaze(maze:targetMaze)

let SPos = serchTargetPoint(maze:targetMaze,targetMapType:MapType.Start)
let GPos = serchTargetPoint(maze:targetMaze,targetMapType:MapType.Goal)

print(SPos ?? "スタートなし")
print(GPos ?? "ゴールなし")


let mazeYCount = targetMaze.count - 1
let mazeXCount = targetMaze[0].count - 1

let maxPos = Vec2(X: mazeYCount, Y: mazeXCount)

var RootList:Array<Direction> = Array<Direction>()
RootList.append (CheckRoad(maze:targetMaze,pos: SPos,beforPos: Vec2(X: 0,Y: 0),maxPos: maxPos,checkType: MapType.Wall)!)


var BlackList:Array<Vec2> = Array<Vec2>()

while true {

let direction = CheckRoad(maze:targetMaze,pos: RootList.last?.Up ?? nil,beforPos: RootList.last?.Now ?? Vec2(),maxPos: maxPos,checkType: MapType.Wall)

var checkFlag:Bool = false

for black in BlackList
{
if(black == direction?.Now ?? Vec2())
{
checkFlag = true
}
}

if(GPos == direction?.Now ?? Vec2())
{
break
}


if(direction != nil && !checkFlag)
{
RootList.append(direction!)
}else
{
let direction = CheckRoad(maze:targetMaze,pos: RootList.last?.Right ?? nil,beforPos: RootList.last?.Now ?? Vec2(),maxPos: maxPos,checkType: MapType.Wall)

var checkFlag:Bool = false

for black in BlackList
{
if(black == direction?.Now ?? Vec2())
{
checkFlag = true
}
}

if(GPos == direction?.Now ?? Vec2())
{
break
}


if(direction != nil && !checkFlag)
{
RootList.append(direction!)
}else
{
let direction = CheckRoad(maze:targetMaze,pos: RootList.last?.Down ?? nil,beforPos: RootList.last?.Now ?? Vec2(),maxPos: maxPos,checkType: MapType.Wall)

var checkFlag:Bool = false

for black in BlackList
{
if(black == direction?.Now ?? Vec2())
{
checkFlag = true
}
}

if(GPos == direction?.Now ?? Vec2())
{
break
}


if(direction != nil && !checkFlag)
{
RootList.append(direction!)
}else
{
let direction = CheckRoad(maze:targetMaze,pos: RootList.last?.Left ?? nil,beforPos: RootList.last?.Now ?? Vec2(),maxPos: maxPos,checkType: MapType.Wall)

var checkFlag:Bool = false

for black in BlackList
{
if(black == direction?.Now ?? Vec2())
{
checkFlag = true
}
}

if(GPos == direction?.Now ?? Vec2())
{
break
}

if(direction != nil && !checkFlag)
{
RootList.append(direction!)
}else
{
BlackList.append(RootList.last?.Now ?? Vec2())
if(RootList.count > 0)
{
RootList.removeLast()
}else
{
break
}
}
}
}
}
}

for root in RootList
{
print(root.Now)
targetMaze[root.Now.Y][root.Now.X] = MapType.Root.rawValue
}

printMaze(maze:targetMaze)

感想

  • Enumのコードに値をセットできるので、コードが読みやすい
  • ちょこちょこ出てくる制約に最初はイライラするが、書いているとなれる
  • 制約があるおかげで、コードに統一感が出る