【Swift】【XCode】画面遷移の方法まとめ
目次
画面遷移の種類
- Storyboardから設定する
- コードから遷移させる
- 値渡しなし
- 値渡しあり
- Navigation Controllerで遷移させる
1. Storyboardから設定する
細かいことを言うと、UIパーツのなかでも、UIControlクラスを継承しているUIパーツが画面遷移(Triggered Segues)のアクションを設定することができます。
- UIButton
- UITextField
- UISegmentControl
- など
Storyboardから設定するするには、Triggered Seguesのactionイベントを使えるパーツである必要があります。
設定方法
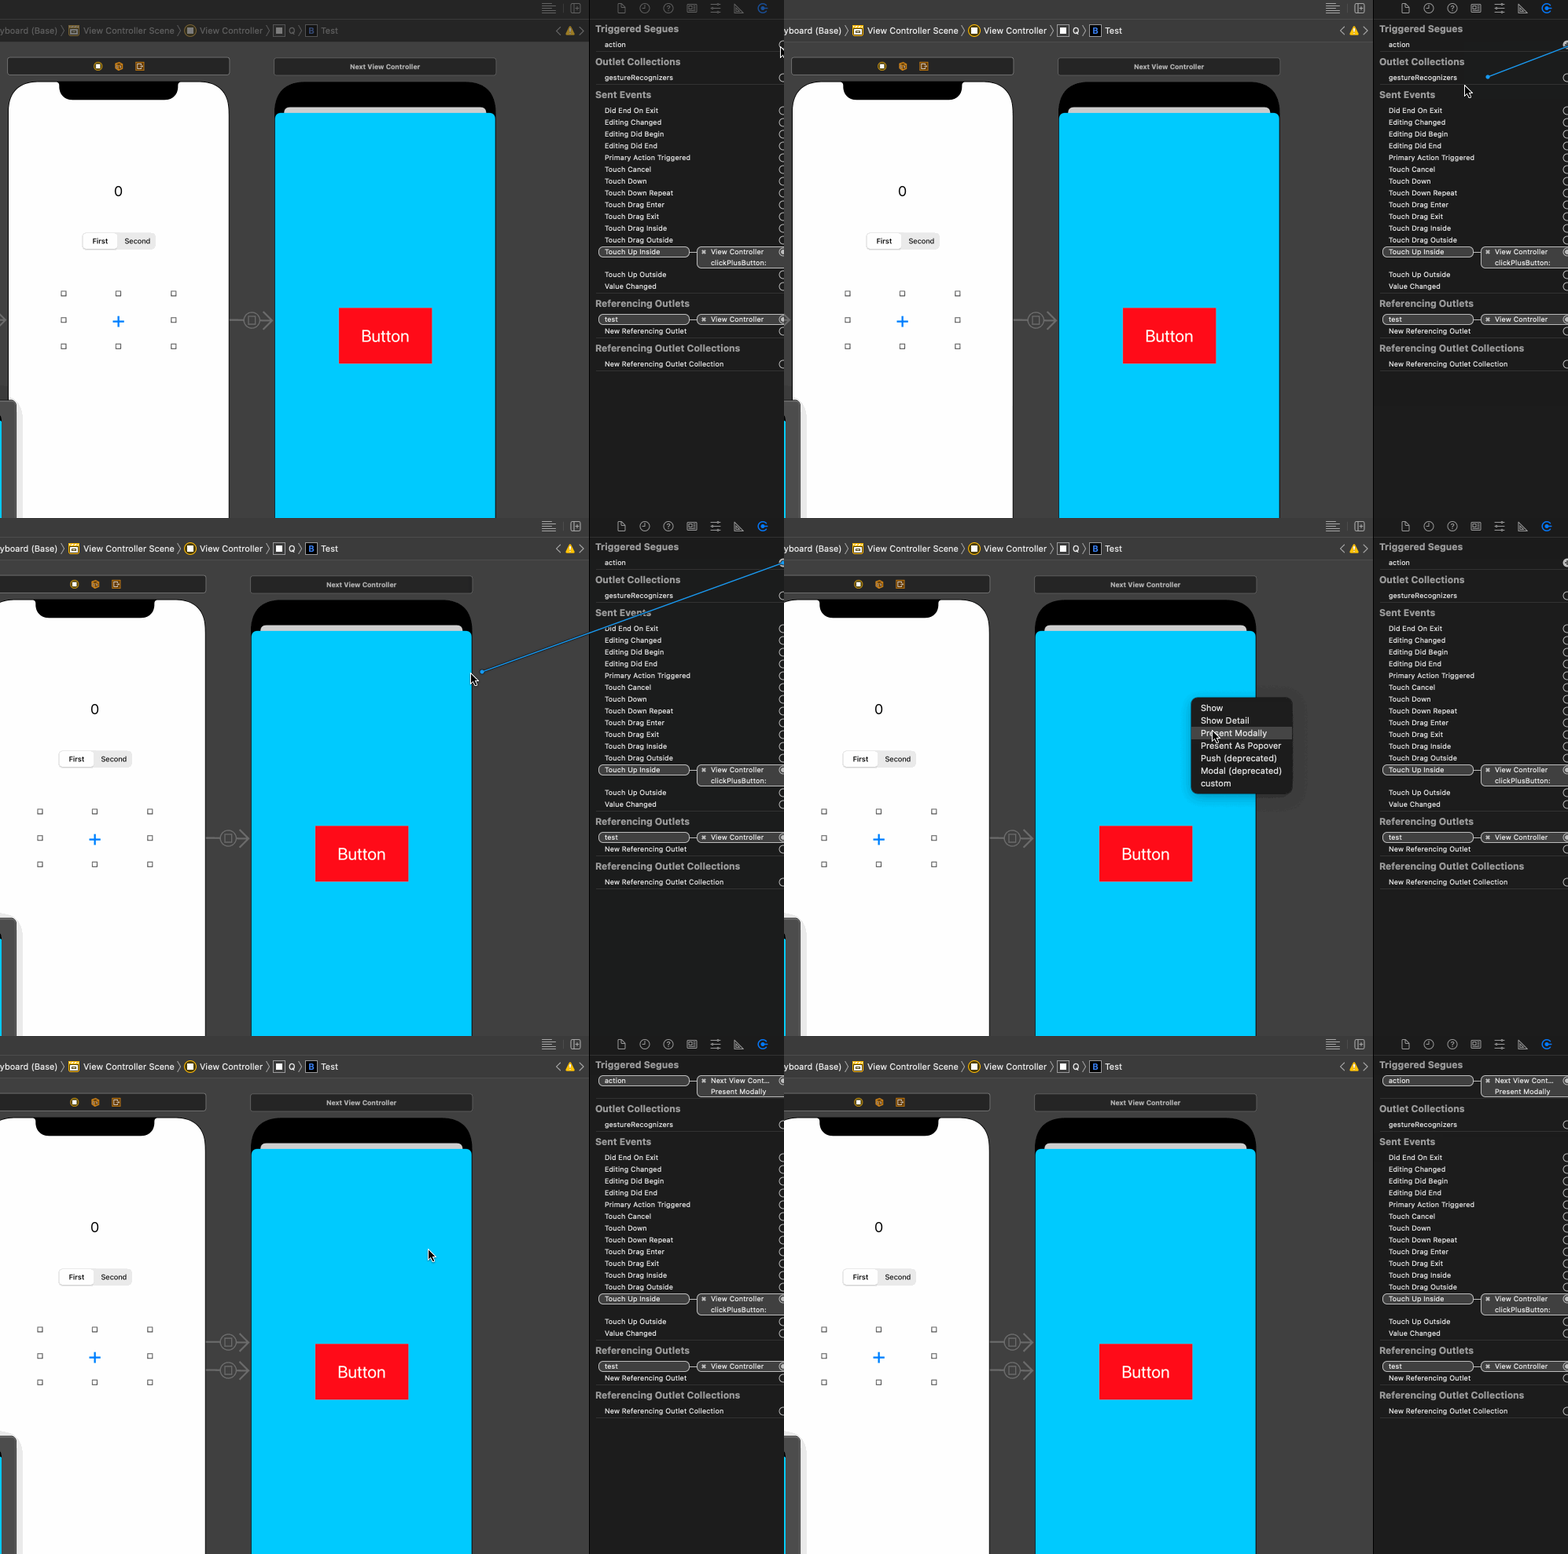
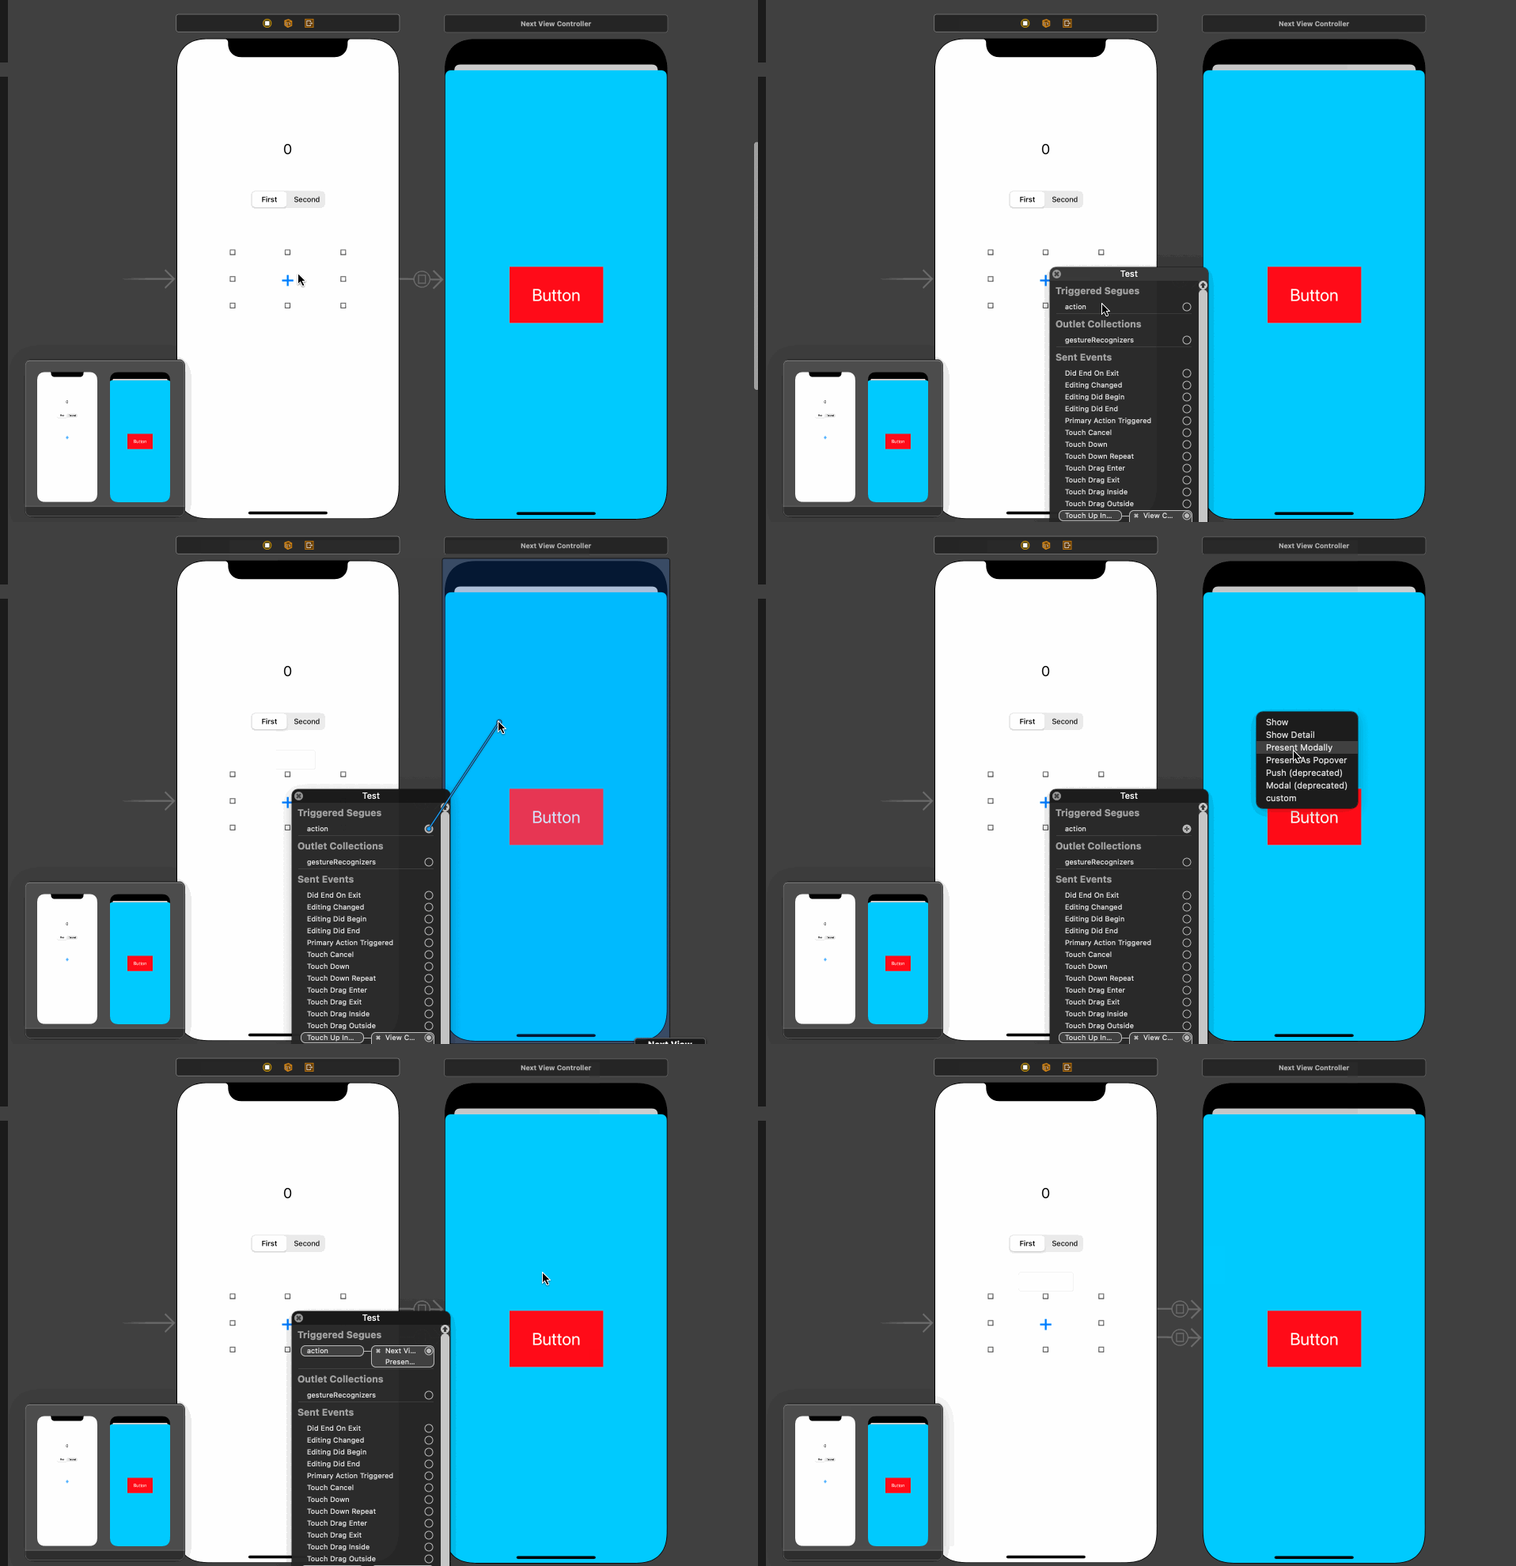
UIButtonなどを選択した状態で、Connection Inspectorからコードをつなげるか、右クリックでConnection Widnowを表示して、別のViewControllerに紐付けます。
- Connection Inspectorからの紐付け
- Connection Windowからの紐付け
2. コードから遷移させる
コードからの遷移をさせたい場合には、2通りのケースがあります。それは、値渡しをする、値渡しをしないケースです。2つのケースではそれぞれコードの書き方が変わります。
どちらのケースでも、共通して、.storyboardで設定が必要になります。
設定
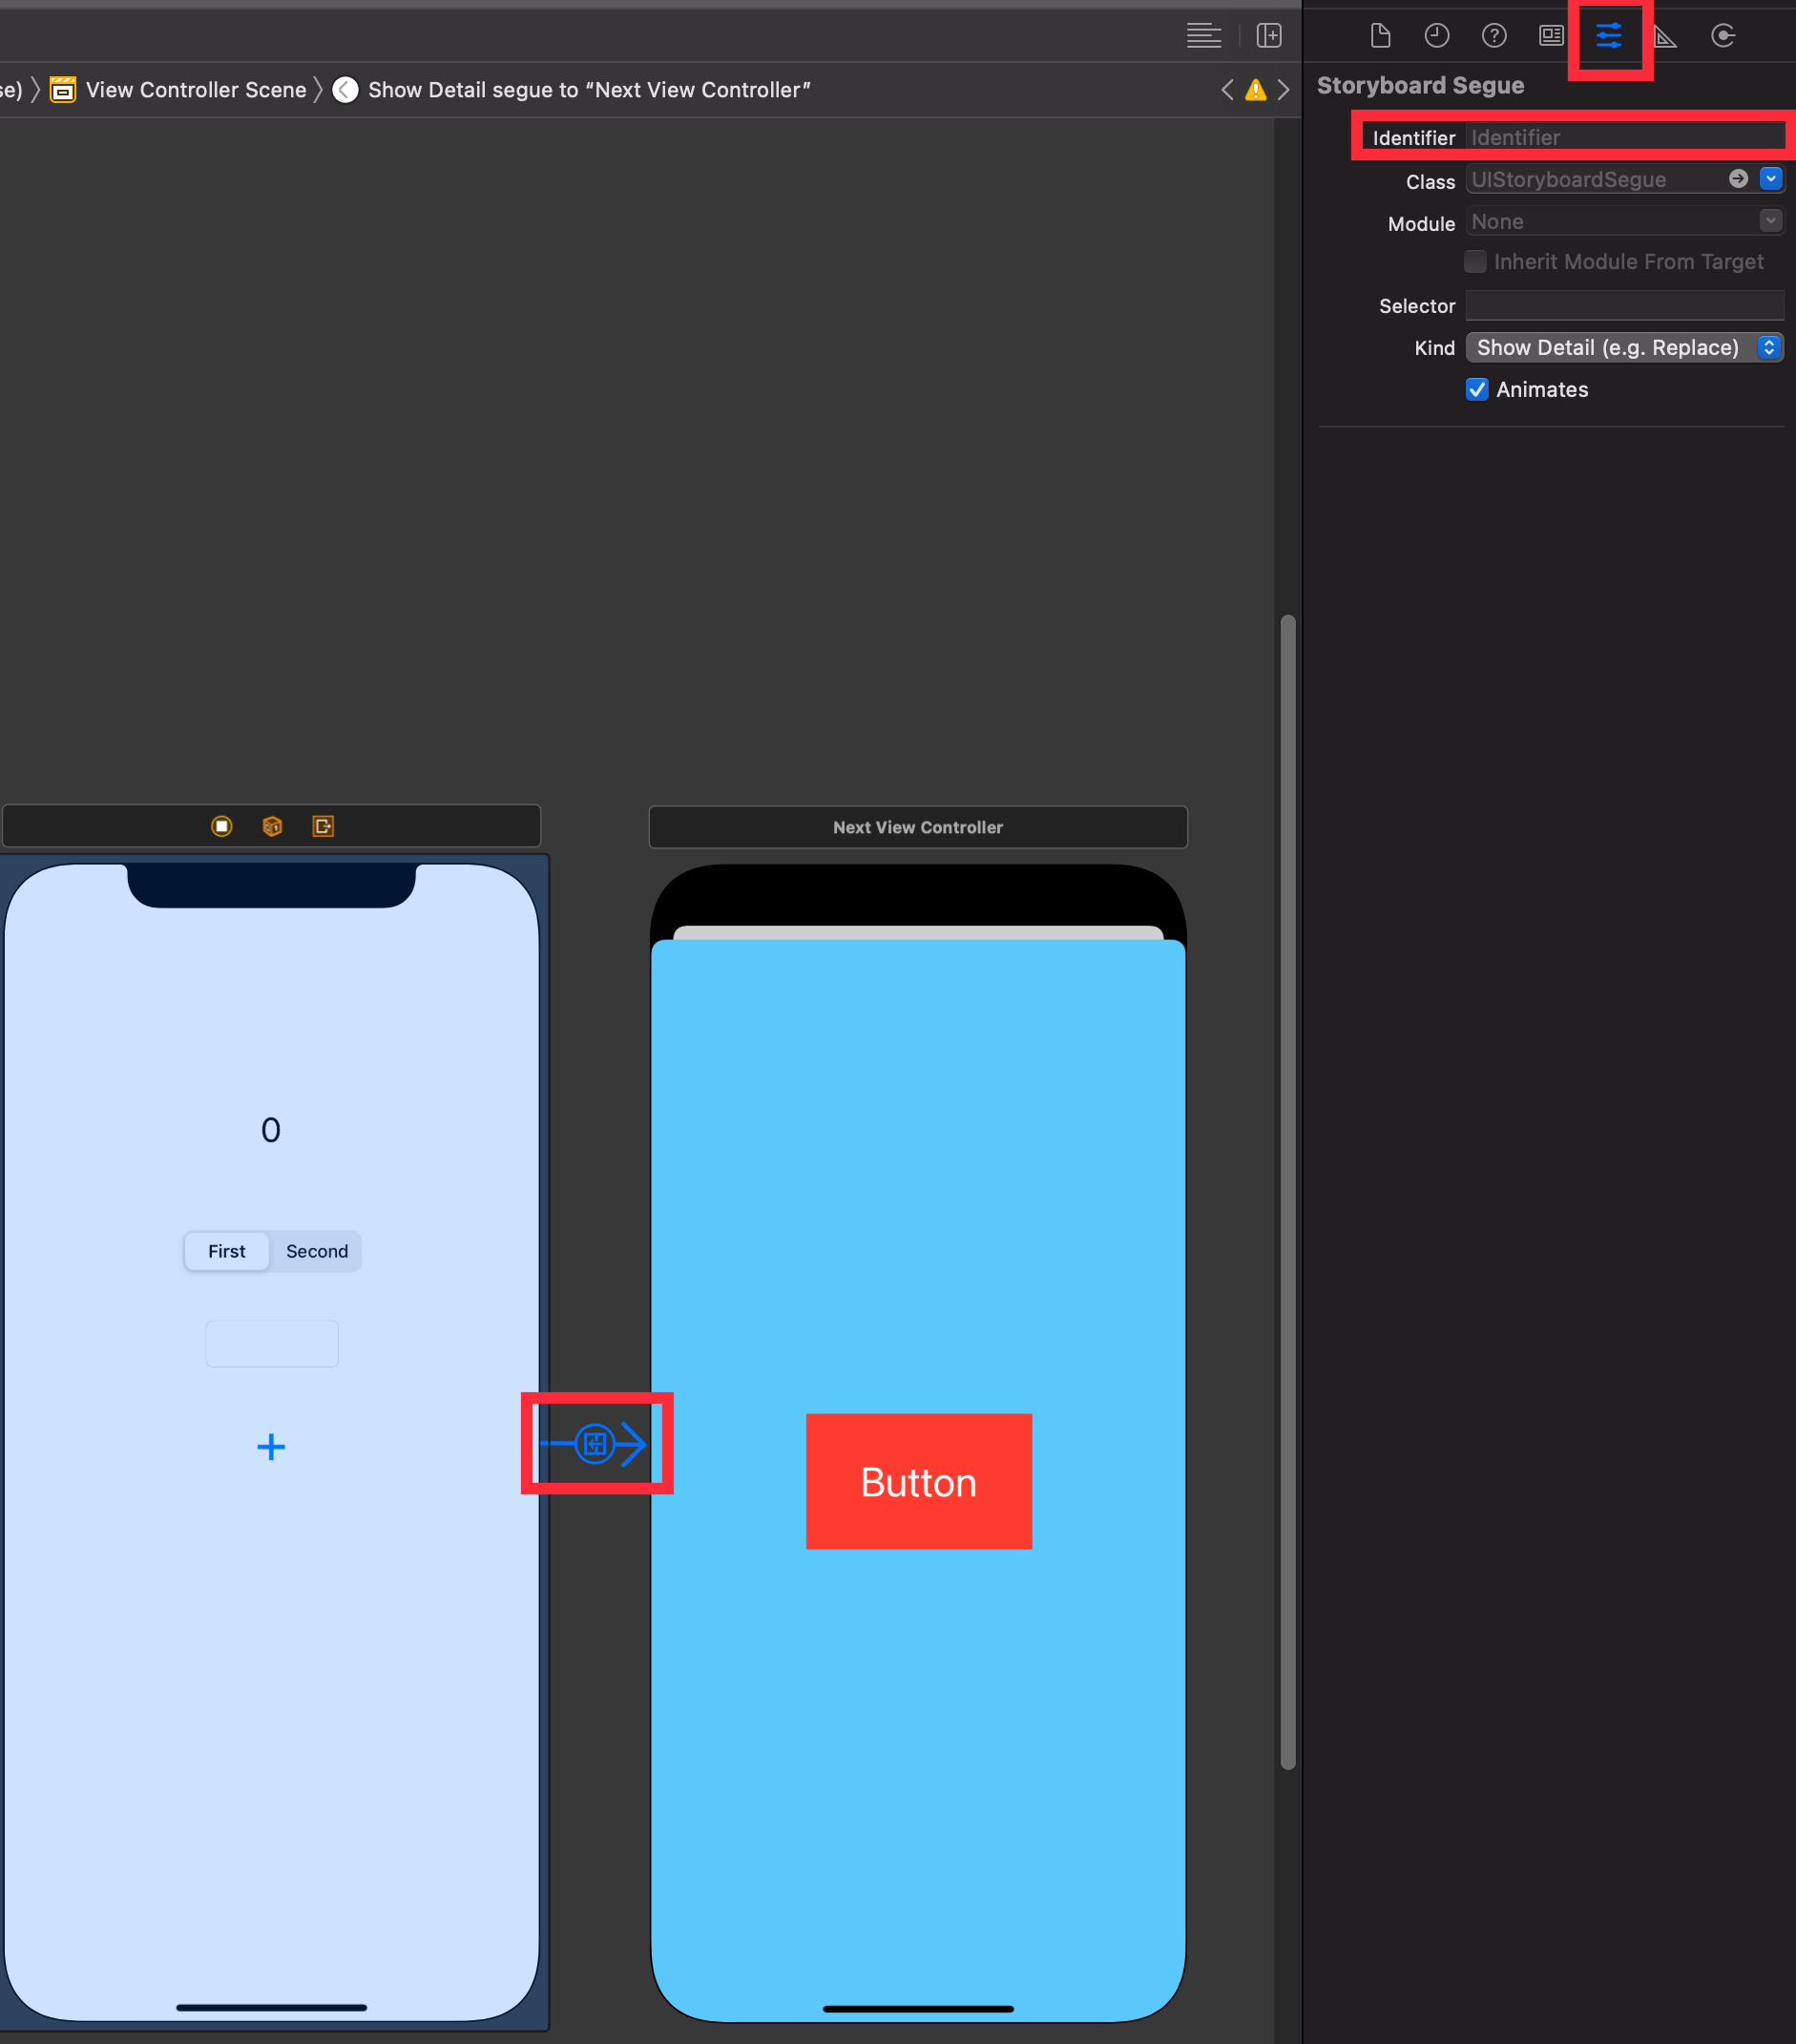
遷移元の、ViewControllerのmanualアクションを遷移先のViewControllerに紐付けます。
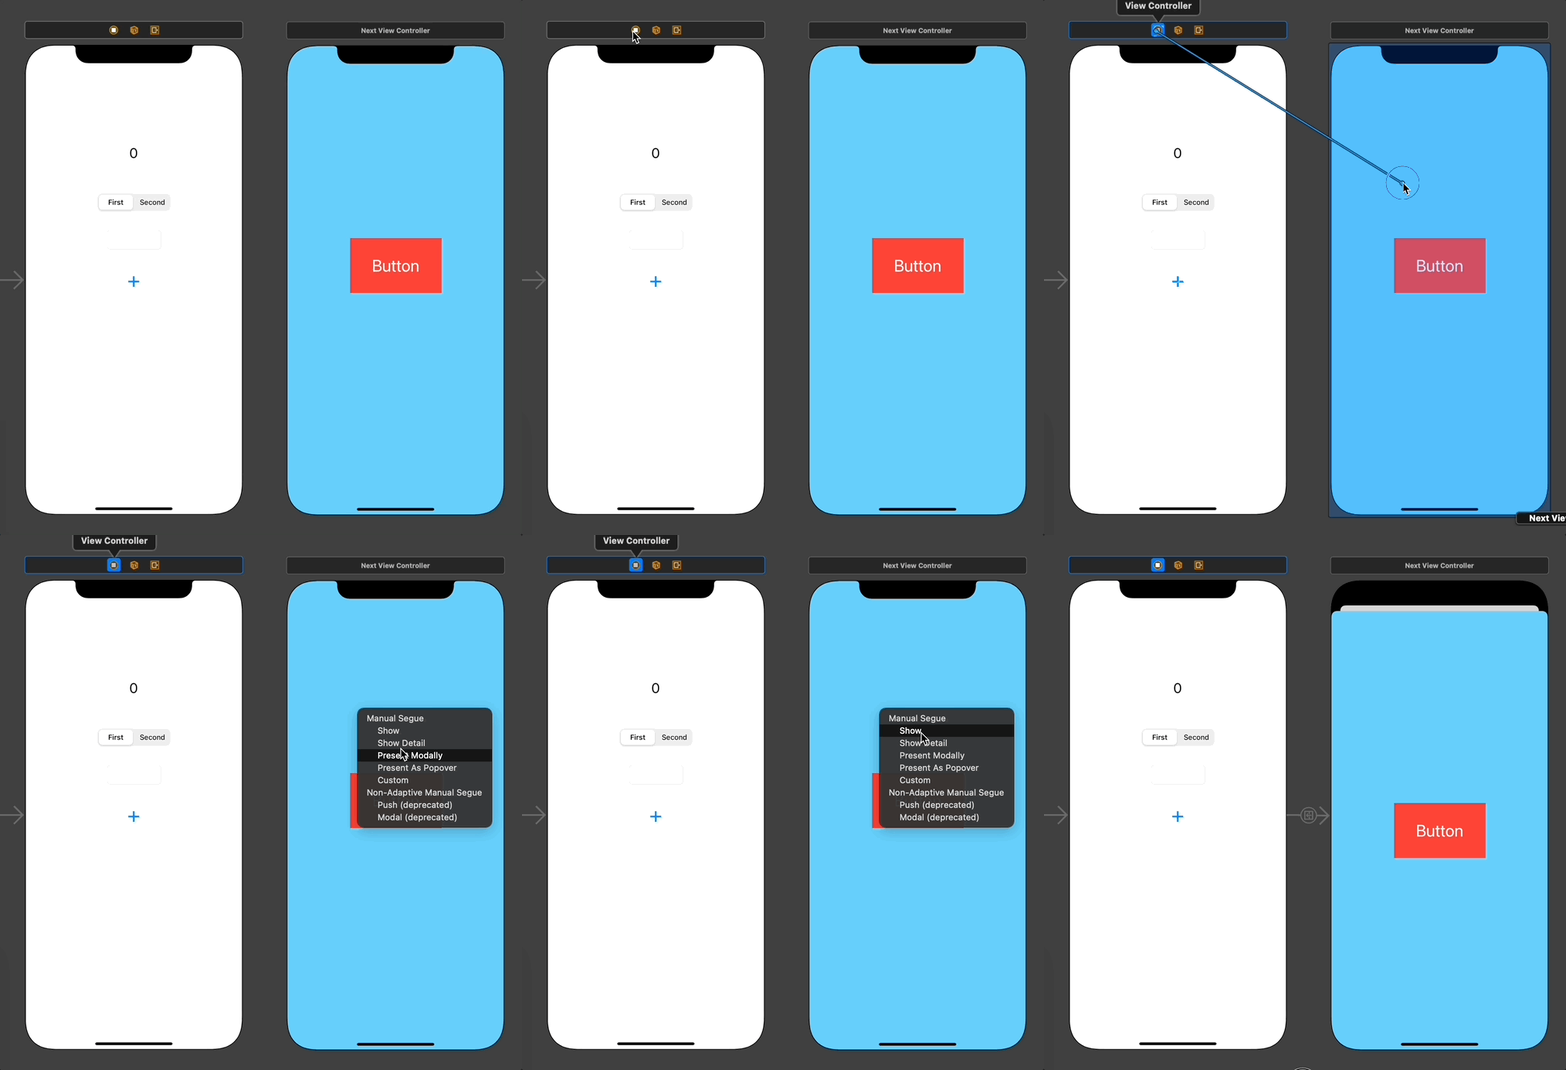
その後、紐付いたことによって出現した、イベントの矢印をクリックし、Storyboard SegueのIdentifierに識別名を付けます。
1. 値渡しをせずに遷移する
値渡しをしない場合、performSegue関数を使用します。
1 | |
2. 値渡しをしながら遷移する
値渡しをする場合、1で使用したperformSegue関数と、prepare関数のオーバーライドを使用します。
prepare関数は、performSegue関数が呼ばれるときに、発火する関数でSegue情報を取得できます。その取得したSegue情報から、遷移先のControllerクラスの参照を取得し、値を引き渡します。
1 | |
1.2共通 遷移先から値渡しをせずに戻る
performSegueを使用した場合、遷移先のViewControllerでdismiss関数を使うことで、遷移元へ戻ることができます。
1 | |
1.2共通 遷移先から値渡しをしながら戻る
protocolを使用します。具体的には、遷移先でprotocolを実装して、遷移元でそのプロトコルを参照するという手順になります。
遷移元
- 遷移先のクラスのprotocolの実装
- 遷移先のクラス生成時の、protocolの紐付け
1
2
3
4
5
6
7
8
9
10
11
12
13
14
15
16
17
18
19
20
21
22
23
24
25
26
27class ViewController: UIViewController,TestDelegate {
override func viewDidLoad() {
super.viewDidLoad()
}
// ボタンクリック時に画面遷移をする
@IBAction func clickFavorite(_ sender: Any) {
performSegue(withIdentifier: "next", sender: nil)
}
// 遷移時の処理を記述
override func prepare(for segue: UIStoryboardSegue, sender: Any?) {
if segue.identifier == "next"{
// 遷移先のNextViewControllerクラスを取得
let nextVC = segue.destination as! NextViewController
// protocolを紐付ける
nextVC.testDelegate = self
}
}
// 実装した遷移先のprotocolが呼ばれたときの処理
func register(data: Personal) {
personalData.append(data)
print(data) // 5
}
}
遷移先
- 使用するデリゲートの生成、変数の宣言、発火処理を記述します。
1
2
3
4
5
6
7
8
9
10
11
12
13
14
15
16
17
18
19
20
21
22
23
24
// 使用するデリゲート
protocol TestDelegate {
func test(data:Int)
}
class NextViewController: UIViewController{
// デリゲートを生成
var testDelegate:TestDelegate?
override func viewDidLoad() {
super.viewDidLoad()
}
// ボタンを押したら、5を遷移元に返す
@IBAction func clickOk(_ sender: Any) {
// Delegate発火
testDelegate?.register(data: 5)
// 遷移元に戻る
dismiss(animated: true, completion: nil)
}
}
Navigation Controllerを使用することで、画面上部にコントロール用の画面を表示することができます。
さらに、Navigation Controllerには画面遷移機能も備わっているので、画面遷移をさせることもできます。
使用手順
Navigation Controllerを追加する
1
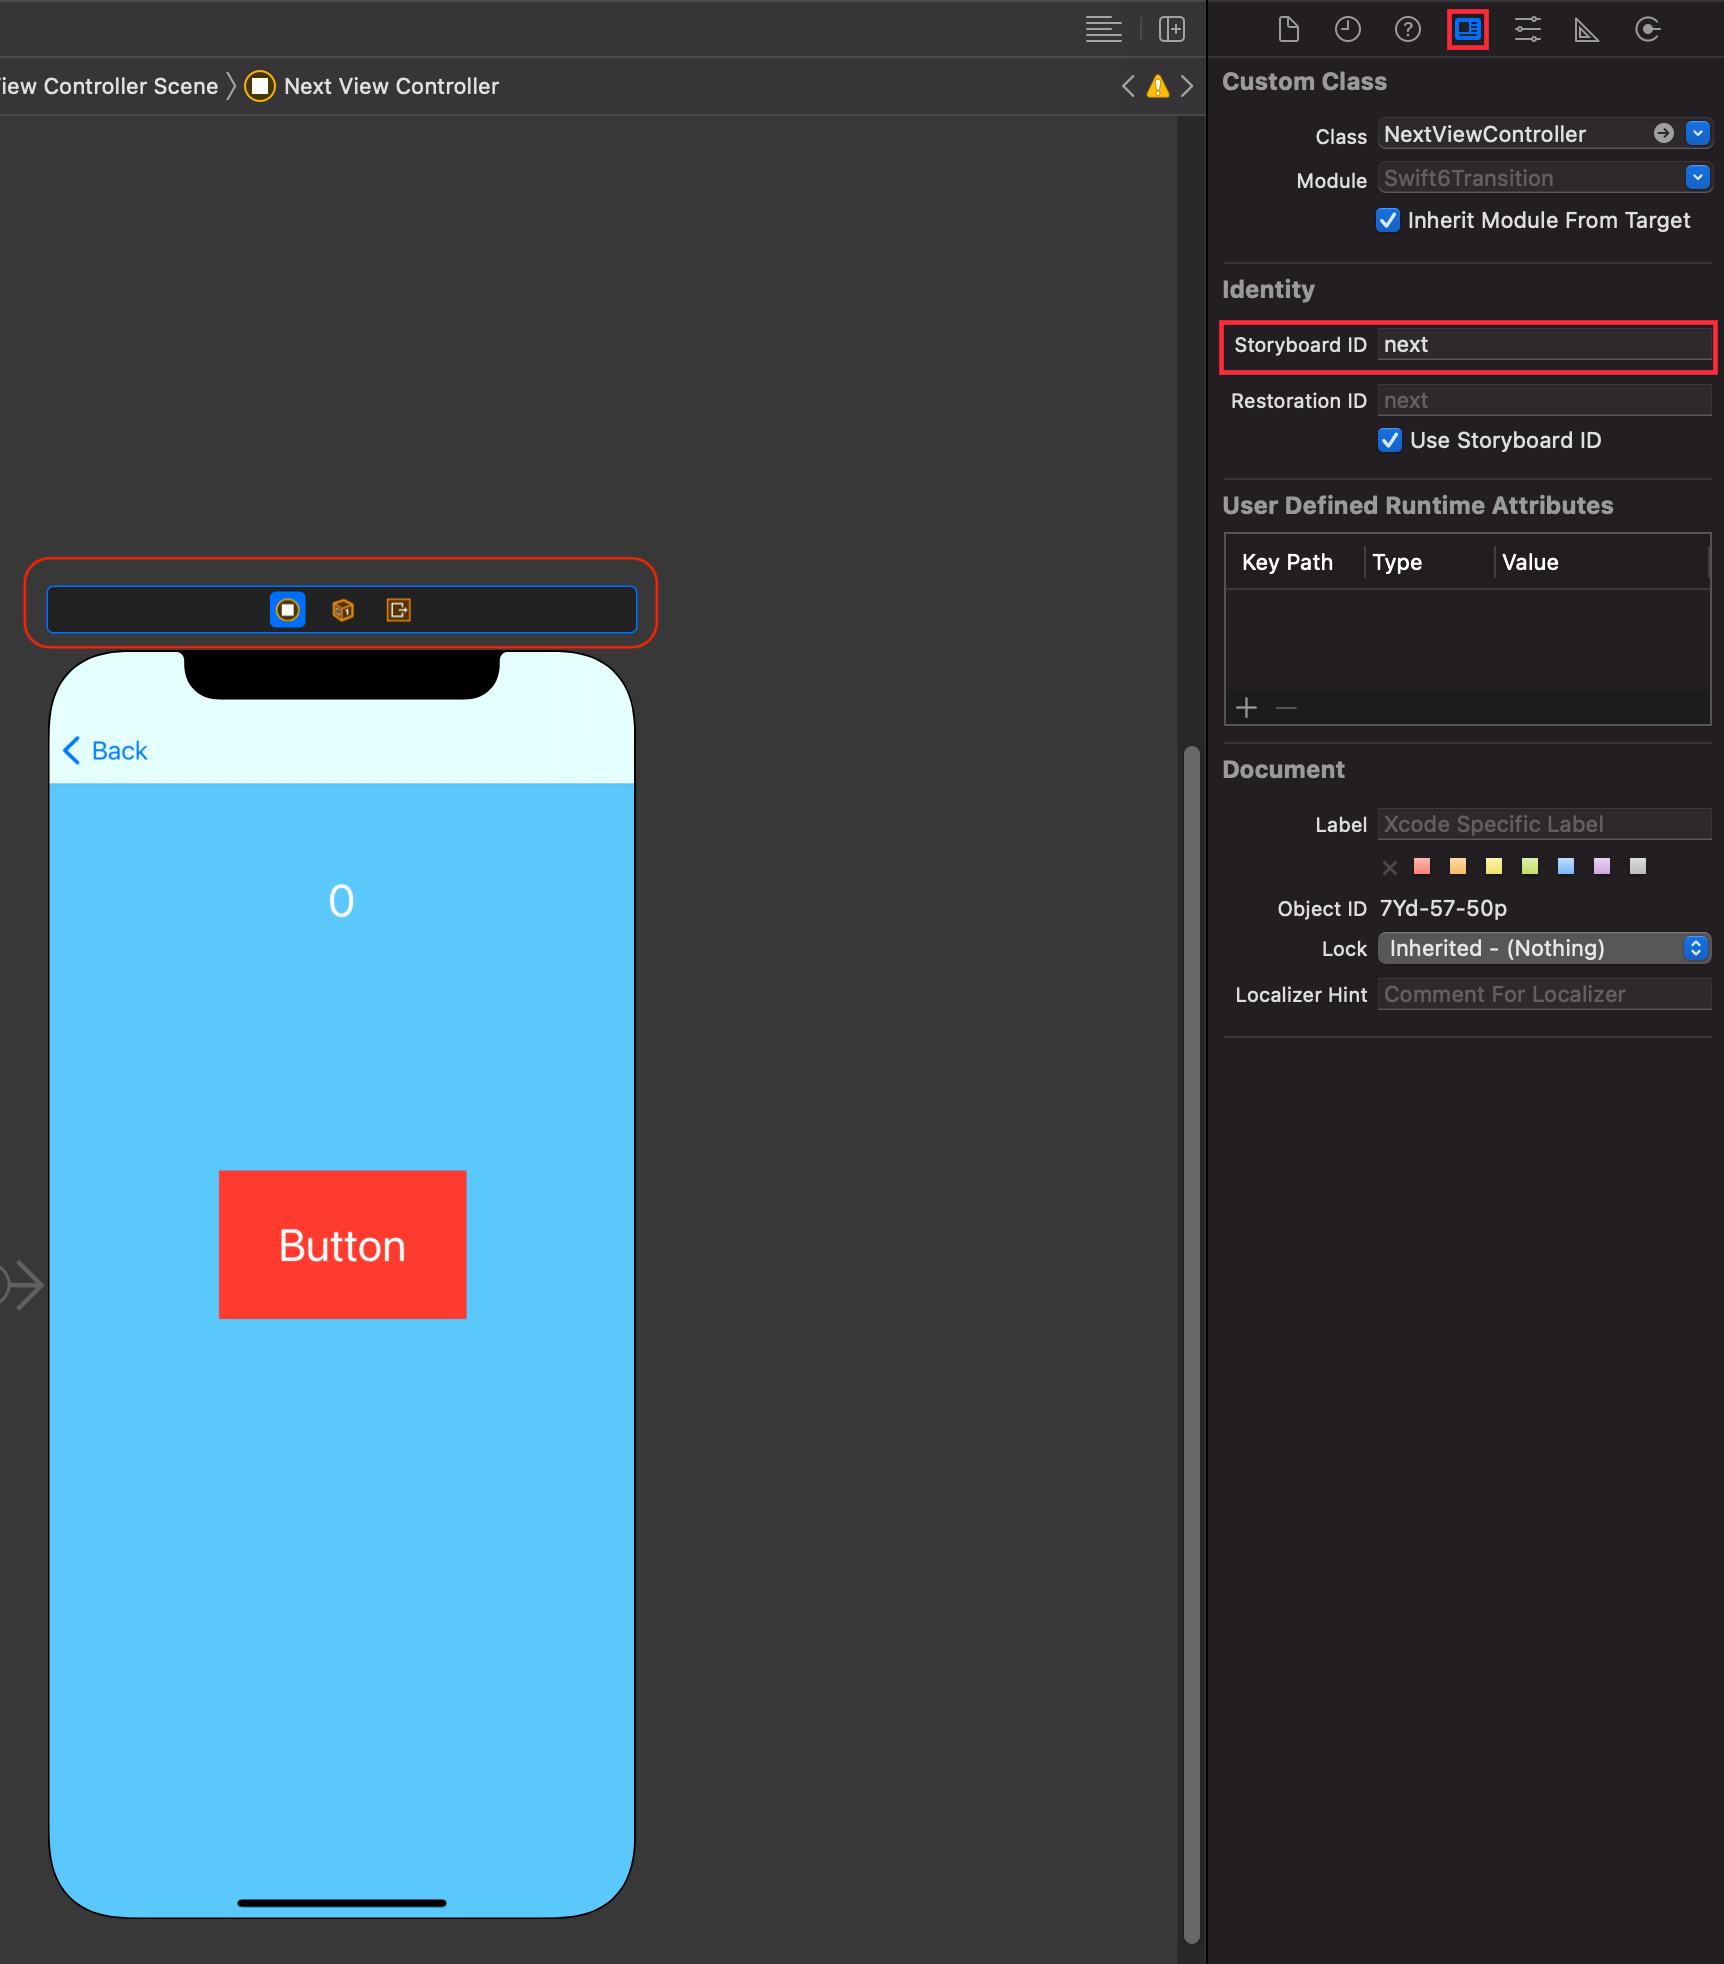
1番最初のViewControllerを選択 -> Edit -> Embed In -> Navigation Controller.sotryboardから遷移先のViewControllerのStoryboardIDを設定
遷移先のViewControllerのインスタンスを生成
sotryboard?.instantiateViewController関数を使用してUIViewController型の変数を生成して、キャストして使用します。
値を受け渡したい場合、このキャストした変数に値を設定します。
1 | |
- Navigation Controllerによる遷移機能の追加
pushViewController関数を使用して、2で生成したViewControllerを設定
1 | |
【Swift】【XCode】画面遷移の方法まとめ
https://daiki-iijima.github.io/2021/07/17/【Swift】【XCode】画面遷移の方法まとめ/
